Introduction
Vulnerability Assessments are an important part of Cybersecurity and they allow organizations to identify weaknesses in their systems before attacks can exploit them. We do not always have time to conduct manual Vulnerability Assessments hence there’s where Automated Tools come into play. In this guide we’ll look into some of the popular Vulnerability Assessments Tools.
What is Vulnerability Assessment
A vulnerability assessment goes beyond just scanning for issues—it also uncovers security misconfigurations and policy noncompliance that could put an organization at risk. The process provides security teams with valuable insights into potential threats, allowing them to prioritize and remediate vulnerabilities effectively.
The assessment typically follows these five key steps:
- Identifying Vulnerabilities – Scanning and mapping out all security weaknesses in the IT environment.
- Analyzing Vulnerabilities – Investigating the source, impact, and root cause of detected vulnerabilities.
- Assessing Risk Levels – Prioritizing vulnerabilities based on severity to focus on critical threats first.
- Remediating Security Gaps – Applying patches, fixing misconfigurations, or implementing security measures to mitigate risks.
- Reporting and Documentation – Creating detailed reports to track vulnerabilities, fixes, and security improvements.
Importance of Automated Vulnerability Scanning
Automated vulnerability scanning is a crucial component of modern cybersecurity, helping organizations identify security weaknesses efficiently and consistently. Unlike manual assessments, automated scanning tools can quickly analyze large IT infrastructures, detecting vulnerabilities in networks, applications, and systems without requiring extensive human effort.
Some of the advantages of Automated Vulnerability Scanning are:
- Efficiency and Speed: Automated Tools can scan thousands of assets in minutes, which reduces the time taken to find vulnerabilities.
- Consistent Regular Scanning: Since these tools can be set up to be fully automated and do not require much supervision this allows organizations to be able to set them up for regular scanning at regular intervals.
- Comprehensive Coverage: These tools usually a wide range of vulnerabilities which includes outdated software, misconfigurations and weak authentication mechanisms.
- Risk Prioritization: Almost all of these tools classify vulnerabilities according to their severity which allows for prioritization of more critical vulnerabilities.
Overview of Tools Covered: Rapidscan, Nikto, Nessus, OWASP ZAP, Nmap
Automated vulnerability scanning relies on various tools, each designed to assess different aspects of security. Below is an overview of five widely used tools in vulnerability assessment:
1. Rapidscan
Rapidscan is an automated vulnerability scanner that combines multiple security tools into a single script, making it a convenient solution for quick vulnerability assessments. It scans web applications for issues like outdated software, misconfigurations, and common exploits.
- Key Features:
- Aggregates results from multiple scanning tools.
- Fast and efficient scanning with minimal user interaction.
- Detects common web vulnerabilities, such as SQL injection and XSS.
2. Nikto
Nikto is a web server scanner designed to identify security vulnerabilities in web applications. It checks for outdated software, insecure configurations, and potentially dangerous files.
- Key Features:
- Scans for over 6,700 known vulnerabilities.
- Detects misconfigurations, default credentials, and outdated software.
- Supports SSL scanning and multiple web servers.
3. Nessus
Nessus, developed by Tenable, is one of the most widely used vulnerability scanners for network and system security assessments. It identifies vulnerabilities, misconfigurations, and compliance issues.
- Key Features:
- Detects over 75,000 vulnerabilities across different platforms.
- Provides detailed risk assessments with exploitability ratings.
- Supports compliance scanning for regulations like PCI-DSS and CIS benchmarks.
4. OWASP ZAP (Zed Attack Proxy)
OWASP ZAP is an open-source tool designed for finding security vulnerabilities in web applications. It is widely used for penetration testing and automated scanning of web applications.
- Key Features:
- Identifies SQL injection, XSS, and other common web vulnerabilities.
- Provides both automated scanning and manual testing features.
- Supports integration with CI/CD pipelines for continuous security testing.
5. Nmap (Network Mapper)
Nmap is a powerful network scanning tool that helps identify open ports, services, and vulnerabilities in network infrastructure. It is often used for network discovery and security audits.
- Key Features:
- Performs port scanning, service detection, and OS fingerprinting.
- Identifies potential vulnerabilities in network devices.
- Supports script-based scanning (Nmap Scripting Engine - NSE) for deeper analysis.
Installing and Configuring Tools
Pre-requisites
The prerequisite for these tools is Kali Linux. You just have to install the Kali Version according to your needs, i.e., Installer Images or VM Images. You can get them from Kali Linux’s website. We’re using Kali because it comes with most tools pre-installed which is helpful for tools like Rapidscan, which work on existing tools. Not to mention Nmap and Nikto are also installed by default on Kali so it makes our job easier.
Rapidscan
The first tool we are going to install is Rapidscan. Rapidscan works on top of existing tools like Nikto, Golismero etc. So the best approach is to install it in Kali Linux since most of the tools used by rapidscan come pre-installed on it.
Clone the Rapidscan’s repository using git clone and then cd into it.
The official repo states that the command to install packages and everything is:
python3 -m pip install .
error: externally-managed-environment

× This environment is externally managed
╰─> To install Python packages system-wide, try apt install
    python3-xyz, where xyz is the package you are trying to
    install.

    If you wish to install a non-Debian-packaged Python package,
    create a virtual environment using python3 -m venv path/to/venv.
    Then use path/to/venv/bin/python and path/to/venv/bin/pip. Make
    sure you have python3-full installed.

    If you wish to install a non-Debian packaged Python application,
    it may be easiest to use pipx install xyz, which will manage a
    virtual environment for you. Make sure you have pipx installed.

    See /usr/share/doc/python3.12/README.venv for more information.

note: If you believe this is a mistake, please contact your Python installation or OS distribution provider. You can override this, at the risk of breaking your Python installation or OS, by passing --break-system-packages.
hint: See PEP 668 for the detailed specification.
As you can see it throws the above error. There are 2 ways to resolve this. The easiest being just adding --break-system-packages to the above command. But the preferred and best solution is creating a venv first. We can do that in the following way:
(kali㉿kali)-[~/Tools/rapidscan]
└─$ python3 -m venv myenv

┌──(kali㉿kali)-[~/Tools/rapidscan]
└─$ source myenv/bin/activate

┌──(myenv)─(kali㉿kali)-[~/Tools/rapidscan]
└─$ python3 -m pip install .
Processing /home/kali/Tools/rapidscan
  Installing build dependencies ... done
  Getting requirements to build wheel ... done
  Preparing metadata (pyproject.toml) ... done
Building wheels for collected packages: rapidscan
  Building wheel for rapidscan (pyproject.toml) ... done
  Created wheel for rapidscan: filename=rapidscan-1.2-py3-none-any.whl size=30002 sha256=05db5cc6ad25a1f93db167d2e927f6327d835192dc731cd14239668189628f8e
  Stored in directory: /tmp/pip-ephem-wheel-cache-z1b_rn79/wheels/34/33/88/763ed60cef750967aee0b88a0052d7c34a0a1564f0948789f9
Successfully built rapidscan
Installing collected packages: rapidscan
Successfully installed rapidscan-1.2
Now Rapidscan is installed properly. To test whether it works properly we will use the following command:
──(myenv)─(kali㉿kali)-[~/Tools/rapidscan]
└─$ python3 rapidscan.py


                                  __         __
                                 /__)_   ●_/(  _ _
                                / ( (//)/(/__)( (//)
                                     /
                     (The Multi-Tool Web Vulnerability Scanner)

                     Check out our new software, NetBot for simulating DDoS attacks - https://github.com/skavngr/netbot


Information:
------------
        ./rapidscan.py example.com: Scans the domain example.com.
        ./rapidscan.py example.com --skip dmitry --skip theHarvester: Skip the 'dmitry' and 'theHarvester' tests.
        ./rapidscan.py example.com --nospinner: Disable the idle loader/spinner.
        ./rapidscan.py --update   : Updates the scanner to the latest version.
        ./rapidscan.py --help     : Displays this help context.
Interactive:
------------
        Ctrl+C: Skips current test.
        Ctrl+Z: Quits RapidScan.
Legends:
--------
        [●]: Scan process may take longer times (not predictable).
        [●]: Scan process may take less than 10 minutes.
        [●]: Scan process may take less than a minute or two.
Vulnerability Information:
--------------------------
         critical : Requires immediate attention as it may lead to compromise or service unavailability.
         high     : May not lead to an immediate compromise, but there are considerable chances for probability.
         medium   : Attacker may correlate multiple vulnerabilities of this type to launch a sophisticated attack.
         low      : Not a serious issue, but it is recommended to tend to the finding.
         info     : Not classified as a vulnerability, simply an useful informational alert to be considered.
As we can see it’s working properly.
Now there’s some other tools that we might have to install since Kali might not have those tools pre-installed. When we run Rapidscan initially we will see the following output
     __         __
                                 /__)_   ●_/(  _ _
                                / ( (//)/(/__)( (//)
                                     /
                     (The Multi-Tool Web Vulnerability Scanner)

                     Check out our new software, NetBot for simulating DDoS attacks - https://github.com/skavngr/netbot


[ Checking Available Security Scanning Tools Phase... Initiated. ]
        Some of these tools ['dnswalk', 'uniscan', 'xsser', 'golismero'] are unavailable or will be skipped. RapidScan will still perform the rest of the tests. Install these tools to fully utilize the functionality of RapidScan.
[ Checking Available Security Scanning Tools Phase... Completed. ]
As we can see in the above output we can see the tools that are unavailable. The scan can still be continued even if those tools are not installed but it is recommended to install them using their relevant documentation.
Nessus
Now we will install Nessus. The first step in doing that is to go Nessus’s website . There we will choose the platform as Linux-Debian-amd64. Download the file but before doing that we need to first install a dependency:
sudo apt-get update #to update package list

zypper install -y hostname
Once it’s done successfully we will install Nessus using:
──(kali㉿kali)-[~/Downloads]
└─$ sudo dpkg -i Nessus-10.8.3-debian10_amd64.deb
Selecting previously unselected package nessus.
(Reading database ... 408655 files and directories currently installed.)
Preparing to unpack Nessus-10.8.3-debian10_amd64.deb ...
Unpacking nessus (10.8.3) ...
Setting up nessus (10.8.3) ...
HMAC : (Module_Integrity) : Pass
SHA1 : (KAT_Digest) : Pass
SHA2 : (KAT_Digest) : Pass
SHA3 : (KAT_Digest) : Pass
TDES : (KAT_Cipher) : Pass
AES_GCM : (KAT_Cipher) : Pass
AES_ECB_Decrypt : (KAT_Cipher) : Pass
RSA : (KAT_Signature) : RNG : (Continuous_RNG_Test) : Pass
Pass
ECDSA : (PCT_Signature) : Pass
ECDSA : (PCT_Signature) : Pass
DSA : (PCT_Signature) : Pass
TLS13_KDF_EXTRACT : (KAT_KDF) : Pass
TLS13_KDF_EXPAND : (KAT_KDF) : Pass
TLS12_PRF : (KAT_KDF) : Pass
PBKDF2 : (KAT_KDF) : Pass
SSHKDF : (KAT_KDF) : Pass
KBKDF : (KAT_KDF) : Pass
HKDF : (KAT_KDF) : Pass
SSKDF : (KAT_KDF) : Pass
X963KDF : (KAT_KDF) : Pass
X942KDF : (KAT_KDF) : Pass
HASH : (DRBG) : Pass
CTR : (DRBG) : Pass
HMAC : (DRBG) : Pass
DH : (KAT_KA) : Pass
ECDH : (KAT_KA) : Pass
RSA_Encrypt : (KAT_AsymmetricCipher) : Pass
RSA_Decrypt : (KAT_AsymmetricCipher) : Pass
RSA_Decrypt : (KAT_AsymmetricCipher) : Pass
INSTALL PASSED
Unpacking Nessus Scanner Core Components...

 - You can start Nessus Scanner by typing /bin/systemctl start nessusd.service
 - Then go to https://kali:8834/ to configure your scanner
Note down your Nessus running URL and then run the following commands to start the Nessus service and check the status of it
──(kali㉿kali)-[~/Downloads]
└─$ /bin/systemctl start nessusd.service

(kali㉿kali)-[~/Downloads]
└─$ sudo systemctl status nessusd.service
● nessusd.service - The Nessus Vulnerability Scanner
     Loaded: loaded (/usr/lib/systemd/system/nessusd.service; disabled; preset: disabled)
     Active: active (running) since Fri 2025-02-14 00:05:40 EST; 17s ago
 Invocation: 293e4fe1e536468ea670dd8f5a465c39
   Main PID: 15709 (nessus-service)
      Tasks: 19 (limit: 2258)
     Memory: 172.7M (peak: 173.2M)
        CPU: 3.204s
     CGroup: /system.slice/nessusd.service
             ├─15709 /opt/nessus/sbin/nessus-service -q
             └─15715 nessusd -q

Feb 14 00:05:40 kali systemd[1]: Started nessusd.service - The Nessus Vulnerability Scanner.
Feb 14 00:05:41 kali nessus-service[15715]: Cached 0 plugin libs in 0msec
Feb 14 00:05:41 kali nessus-service[15715]: Cached 0 plugin libs in 0msec
As we can see it’s running actively and now we will go to the URL that we noted earlier to access the Nessus Dashboard. We might get a security risk warning but go to advanced and access the page anyway.
We will now see this page
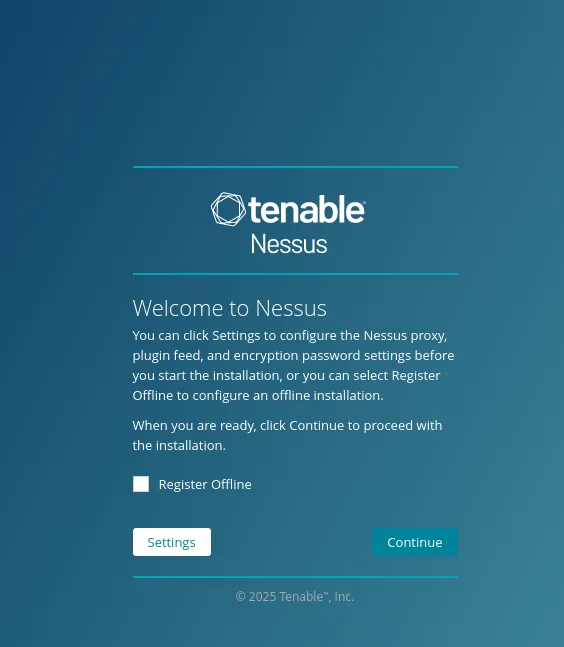
Nessus Welcome Screen
We will click on continue and then select the Register for Nessus Essentials option. Just enter your information on the following page and then continue. Copy the Activation Code somewhere and then you’ll see the following page:
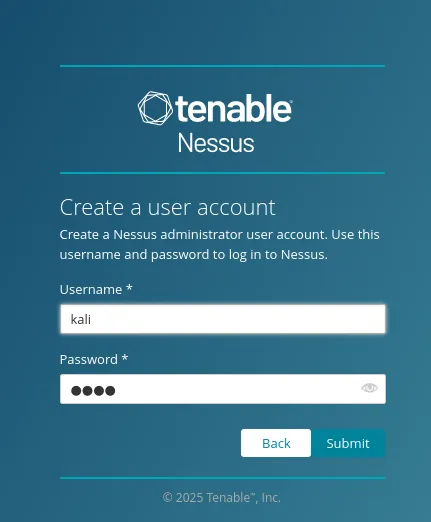
Nessus User Account Screen
Create a user account and then click on submit. Make sure you remember the password since you’ll use it later.
Nessus will now start downloading and installing the plugins. This will take some time. and once it is done the dashboard will load. However some plugins will still be compiling and you’ve got to wait some more. Once you see the following screen then the plugins are done compiling
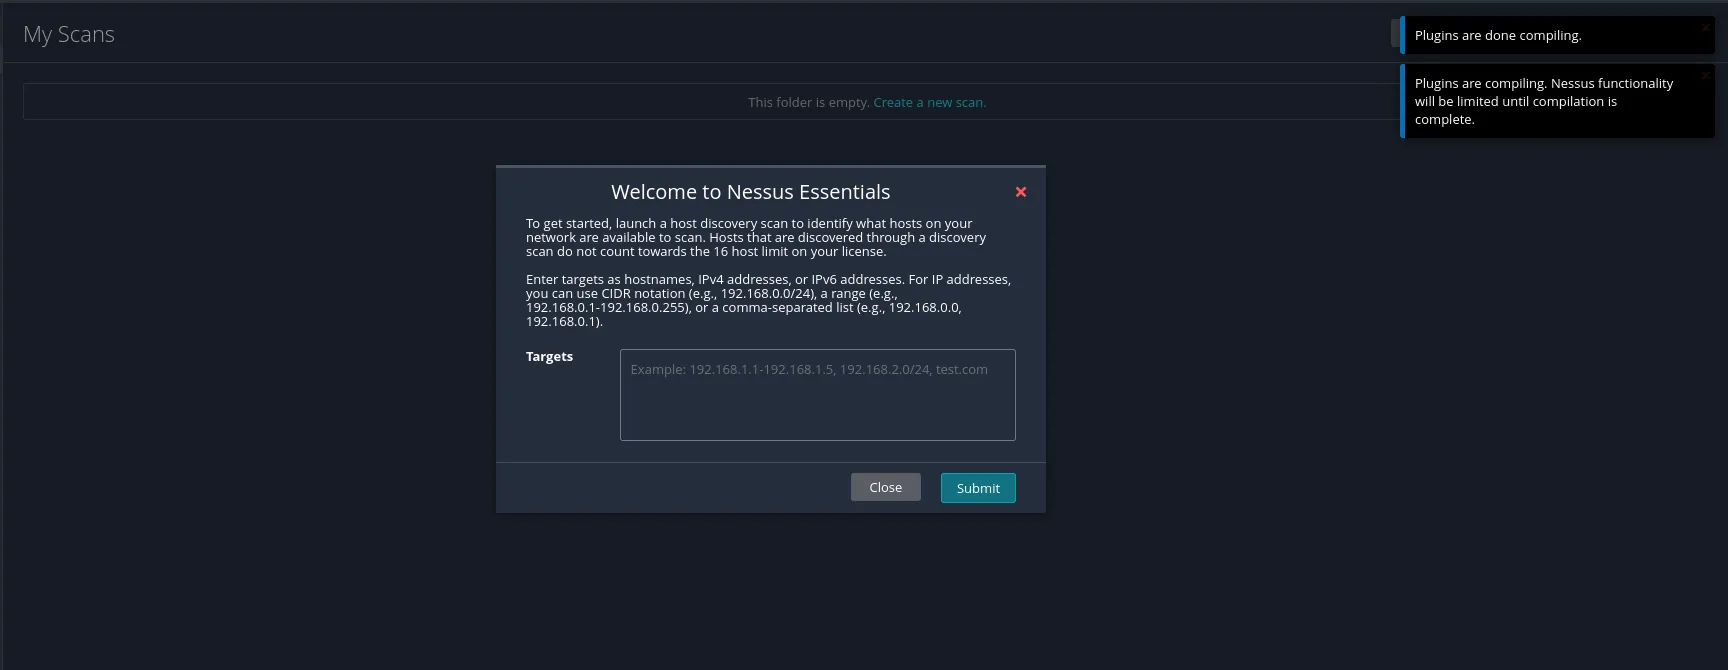
Nessus Dashboard Welcome
OWASP ZAP
We will now look at how to install ZAP. First we will go to the ZAP Download Page. We will download the Linux Installer package.
Once it’s done downloading we will run the following commands to run the installer:
┌──(kali㉿kali)-[~/Downloads]
└─$ chmod +x ZAP_2_16_0_unix.sh

┌──(kali㉿kali)-[~/Downloads]
└─$ sudo ./ZAP_2_16_0_unix.sh
Starting Installer ...
Follow the on-screen instructions after the installer launches, to install ZAP.
Running Vulnerability Scans
Rapidscan
Command-Line Usage
Before running Rapidscan we need to activate the virtual environment we created during installation earlier. The command is source myenv/bin/activate . Now we will look at the command line usage and what commands can be run:
python3 rapidscan.py example.comThis will initiate Rapidscan against the given website.python3 rapidscan.py [example.com](http://example.com/) --skip dmitry --skip theHarvesterThis will skip dmitry and Harvester scans against the website.python3 rapidscan.py [example.com](http://example.com/) --nospinnerDisables the idle loader/spinnerpython3 [rapidscan.py](http://rapidscan.py) —updateThis will update the scanner to the lastest version availablepython3 [rapidscan.py](http://rapidscan.py) --helpDisplays the help menu
Other than this we also have Ctrl+C to skip the current test and Ctrl+Z to end the scan.
We also need to know the color codes and what they represent which can be seen in the below picture:

This is pretty much self explanatory.
Interpreting Scan Results
Now we will run a scan to show how the output works. I’ll be using Google Gruyere which is a buggy web application hosted by google. To start the scan we will run the command:
python3 [rapidscan.py](http://rapidscan.py) *website*
Initiating the scan we see the following output immediately:
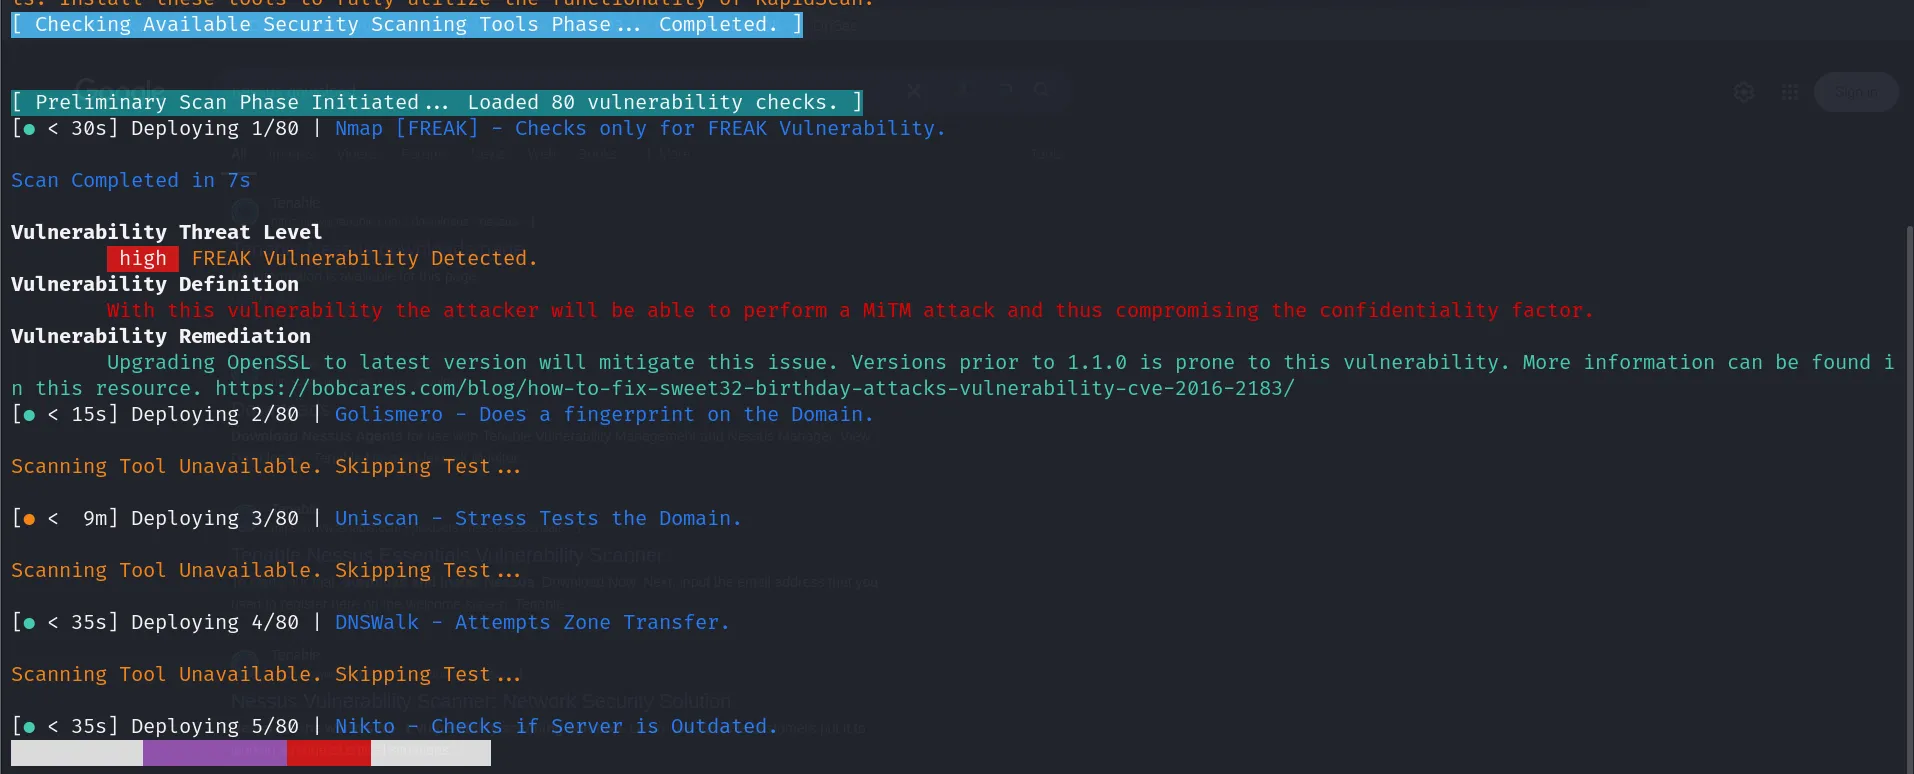
There are few things to note here. Firstly we detected a vulnerability which ranks High. We can see the definition and remediation for it. We can also look at the detail by looking up the Vulnerability.
Secondly, since some tools aren’t available their corresponding tests will not be performed. Also the color coding next to the test and the time shows the estimated time needed for the test to run. Since there are 80 tests in total we will not cover each of them since it would make the guide too long.
Nikto
Command-Line Usage
We will now look at Nikto. If it’s installed properly we will run nikto -Version and if it displays the version it means Nikto is installed and working properly. We can run nikto -Help to see the help menu but running an incorrect command also displays it. The help menu is as follows:
┌──(kali㉿kali)-[~]
└─$ nikto -Help

   Options:
       -ask+               Whether to ask about submitting updates
                               yes   Ask about each (default)
                               no    Don't ask, don't send
                               auto  Don't ask, just send
       -check6             Check if IPv6 is working (connects to ipv6.google.com or value set in nikto.conf)
       -Cgidirs+           Scan these CGI dirs: "none", "all", or values like "/cgi/ /cgi-a/"
       -config+            Use this config file
       -Display+           Turn on/off display outputs:
                               1     Show redirects
                               2     Show cookies received
                               3     Show all 200/OK responses
                               4     Show URLs which require authentication
                               D     Debug output
                               E     Display all HTTP errors
                               P     Print progress to STDOUT
                               S     Scrub output of IPs and hostnames
                               V     Verbose output
       -dbcheck           Check database and other key files for syntax errors
       -evasion+          Encoding technique:
                               1     Random URI encoding (non-UTF8)
                               2     Directory self-reference (/./)
                               3     Premature URL ending
                               4     Prepend long random string
                               5     Fake parameter
                               6     TAB as request spacer
                               7     Change the case of the URL
                               8     Use Windows directory separator (\)
                               A     Use a carriage return (0x0d) as a request spacer
                               B     Use binary value 0x0b as a request spacer
        -followredirects   Follow 3xx redirects to new location
        -Format+           Save file (-o) format:
                               csv   Comma-separated-value
                               json  JSON Format
                               htm   HTML Format
                               nbe   Nessus NBE format
                               sql   Generic SQL (see docs for schema)
                               txt   Plain text
                               xml   XML Format
                               (if not specified the format will be taken from the file extension passed to -output)
       -Help              This help information
       -host+             Target host/URL
       -id+               Host authentication to use, format is id:pass or id:pass:realm
       -ipv4                 IPv4 Only
       -ipv6                 IPv6 Only
       -key+              Client certificate key file
       -list-plugins      List all available plugins, perform no testing
       -maxtime+          Maximum testing time per host (e.g., 1h, 60m, 3600s)
       -mutate+           Guess additional file names:
                               1     Test all files with all root directories
                               2     Guess for password file names
                               3     Enumerate user names via Apache (/~user type requests)
                               4     Enumerate user names via cgiwrap (/cgi-bin/cgiwrap/~user type requests)
                               5     Attempt to brute force sub-domain names, assume that the host name is the parent domain
                               6     Attempt to guess directory names from the supplied dictionary file
       -mutate-options    Provide information for mutates
       -nointeractive     Disables interactive features
       -nolookup          Disables DNS lookups
       -nossl             Disables the use of SSL
       -noslash           Strip trailing slash from URL (e.g., '/admin/' to '/admin')
       -no404             Disables nikto attempting to guess a 404 page
       -Option            Over-ride an option in nikto.conf, can be issued multiple times
       -output+           Write output to this file ('.' for auto-name)
       -Pause+            Pause between tests (seconds)
       -Plugins+          List of plugins to run (default: ALL)
       -port+             Port to use (default 80)
       -RSAcert+          Client certificate file
       -root+             Prepend root value to all requests, format is /directory
       -Save              Save positive responses to this directory ('.' for auto-name)
       -ssl               Force ssl mode on port
       -Tuning+           Scan tuning:
                               1     Interesting File / Seen in logs
                               2     Misconfiguration / Default File
                               3     Information Disclosure
                               4     Injection (XSS/Script/HTML)
                               5     Remote File Retrieval - Inside Web Root
                               6     Denial of Service
                               7     Remote File Retrieval - Server Wide
                               8     Command Execution / Remote Shell
                               9     SQL Injection
                               0     File Upload
                               a     Authentication Bypass
                               b     Software Identification
                               c     Remote Source Inclusion
                               d     WebService
                               e     Administrative Console
                               x     Reverse Tuning Options (i.e., include all except specified)
       -timeout+          Timeout for requests (default 10 seconds)
       -Userdbs           Load only user databases, not the standard databases
                               all   Disable standard dbs and load only user dbs
                               tests Disable only db_tests and load udb_tests
       -useragent         Over-rides the default useragent
       -until             Run until the specified time or duration
       -url+              Target host/URL (alias of -host)
       -usecookies        Use cookies from responses in future requests
       -useproxy          Use the proxy defined in nikto.conf, or argument http://server:port
       -Version           Print plugin and database versions
       -vhost+            Virtual host (for Host header)
       -404code           Ignore these HTTP codes as negative responses (always). Format is "302,301".
       -404string         Ignore this string in response body content as negative response (always). Can be a regular expression.
                + requires a value
As you can see there’s a lot of options and setting we can configure. We will look in detail into the tool at a later point of time but for now the default scan should be good enough. We only need to look at the following command to run the scan using the default parameters
nikto -h *website*
Interpreting Scan Results
nikto -h https://google-gruyere.appspot.com/503448883060980464503905731681877492644/
- Nikto v2.5.0
---------------------------------------------------------------------------
+ Multiple IPs found: 192.178.24.244, 2a00:1450:4018:806::2014
+ Target IP:          192.178.24.244
+ Target Hostname:    google-gruyere.appspot.com
+ Target Port:        443
---------------------------------------------------------------------------
+ SSL Info:        Subject:  /CN=*.appspot.com
                   Ciphers:  TLS_AES_256_GCM_SHA384
                   Issuer:   /C=US/O=Google Trust Services/CN=WR2
+ Start Time:         2025-02-17 00:11:40 (GMT-5)
---------------------------------------------------------------------------
+ Server: Google Frontend
+ Multiple index files found: /503448883060980464503905731681877492644/index.xml, /503448883060980464503905731681877492644/default.htm, /503448883060980464503905731681877492644/index.aspx, /503448883060980464503905731681877492644/index.do, /503448883060980464503905731681877492644/index.shtml, /503448883060980464503905731681877492644/index.cgi, /503448883060980464503905731681877492644/index.htm, /503448883060980464503905731681877492644/index.php4, /503448883060980464503905731681877492644/default.aspx, /503448883060980464503905731681877492644/index.php5, /503448883060980464503905731681877492644/index.cfm, /503448883060980464503905731681877492644/index.pl, /503448883060980464503905731681877492644/index.asp, /503448883060980464503905731681877492644/default.asp, /503448883060980464503905731681877492644/index.php3, /503448883060980464503905731681877492644/index.jsp, /503448883060980464503905731681877492644/index.html, /503448883060980464503905731681877492644/index.php, /503448883060980464503905731681877492644/index.jhtml, /503448883060980464503905731681877492644/index.php7.
+ /google-gruyereappspot.tar: Potentially interesting backup/cert file found. . See: https://cwe.mitre.org/data/definitions/530.html
+ /backup.egg: Potentially interesting backup/cert file found. . See: https://cwe.mitre.org/data/definitions/530.html
+ /google-gruyereappspotcom.tar.bz2: Potentially interesting backup/cert file found. . See: https://cwe.mitre.org/data/definitions/530.html
+ /google-gruyereappspotcom.tar.lzma: Potentially interesting backup/cert file found. . See: https://cwe.mitre.org/data/definitions/530.html
+ /google-gruyere.tar.bz2: Potentially interesting backup/cert file found. . See: https://cwe.mitre.org/data/definitions/530.html
++ /dump.egg: Potentially interesting backup/cert file found. . See: https://cwe.mitre.org/data/definitions/530.html
+ /dump.tar: Potentially interesting backup/cert file found. . See: https://cwe.mitre.org/data/definitions/530.html
+ /google-gruyereappspot.jks: Potentially interesting backup/cert file found. . See: https://cwe.mitre.org/data/definitions/530.html
+ Server is using a wildcard certificate: *.appspot.com. See: https://en.wikipedia.org/wiki/Wildcard_certificate
+ OPTIONS: Allowed HTTP Methods: GET, POST .
+ /503448883060980464503905731681877492644/kboard/: KBoard Forum 0.3.0 and prior have a security problem in forum_edit_post.php, forum_post.php and forum_reply.php.
+ /503448883060980464503905731681877492644/lists/admin/: PHPList pre 2.6.4 contains a number of vulnerabilities including remote administrative access, harvesting user info and more. Default login to admin interface is admin/phplist.
+ /503448883060980464503905731681877492644/splashAdmin.php: Cobalt Qube 3 admin is running. This may have multiple security problems which could not be tested remotely. See: https://seclists.org/bugtraq/2002/Jul/262
+ /503448883060980464503905731681877492644/ssdefs/: Siteseed pre 1.4.2 has 'major' security problems.
+ /503448883060980464503905731681877492644/sshome/: Siteseed pre 1.4.2 has 'major' security problems.
+ /503448883060980464503905731681877492644/tiki/: Tiki 1.7.2 and previous allowed restricted Wiki pages to be viewed via a 'URL trick'. Default login/pass could be admin/admin.
+ /503448883060980464503905731681877492644/guestbook/pwd: PHP-Gastebuch 1.60 Beta reveals the md5 hash of the admin password.
+ /503448883060980464503905731681877492644/help/: Help directory should not be accessible.
We have skipped most of the output as this is a very vulnerable web application and as a result will have a lot of vulnerabilities present. I just am showing this output so you note down the structure of the Nikto output.
Nessus
Creating and Running a Scan
We looked at how to access the Nessus Dashboard in the Nessus Installation Section. Now once we’ve accessed the Dashboard we will be greeted by the following screen:
We will click on New Scan or Create a New Scan.
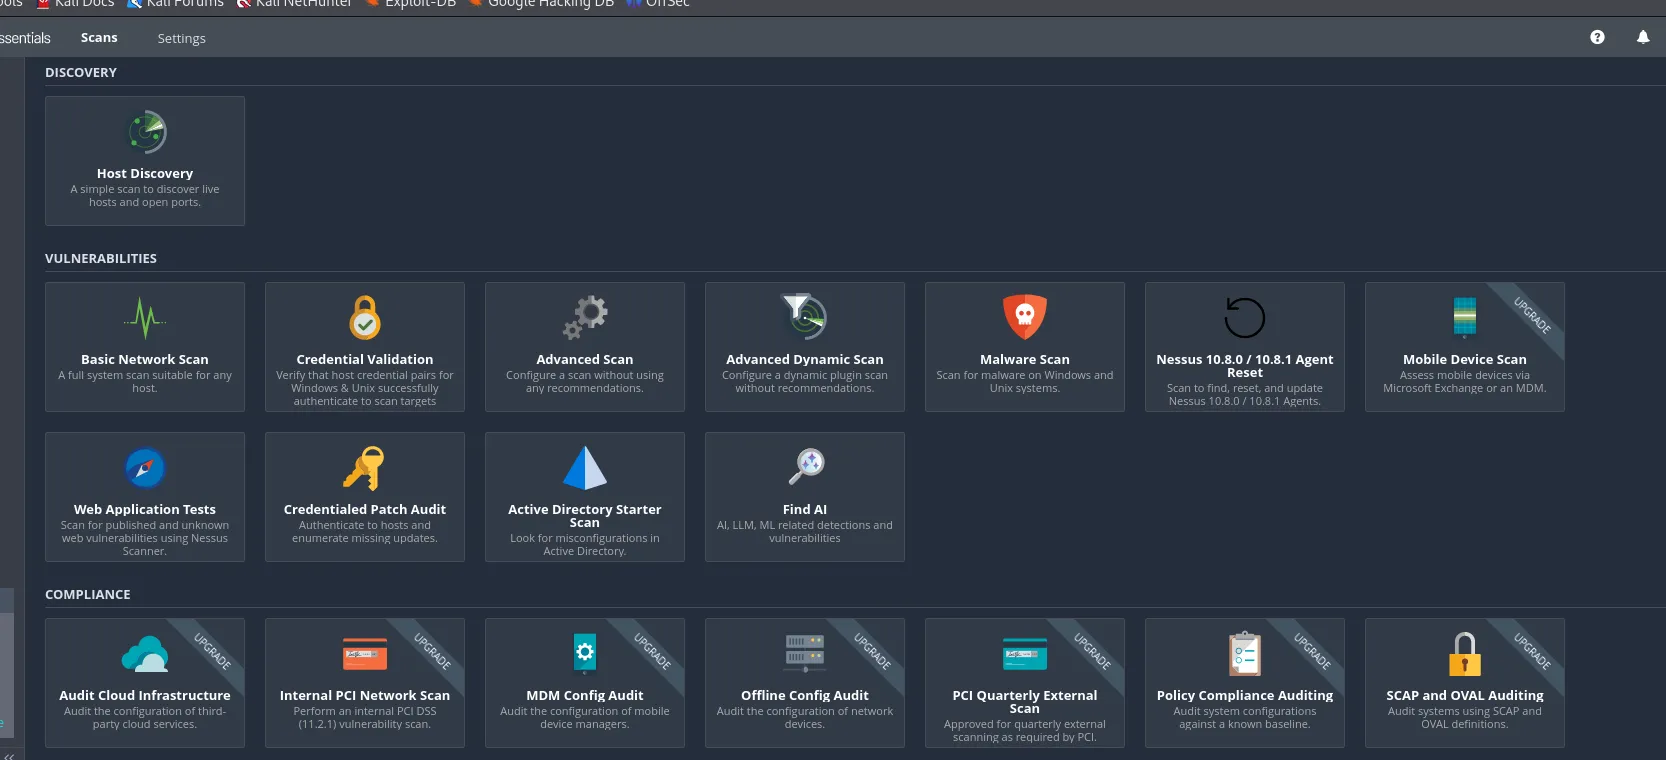
As we can see there are quite a lot of scan options present. We are interested in Web Application Tests since we’re testing a website hence we’ll select that.
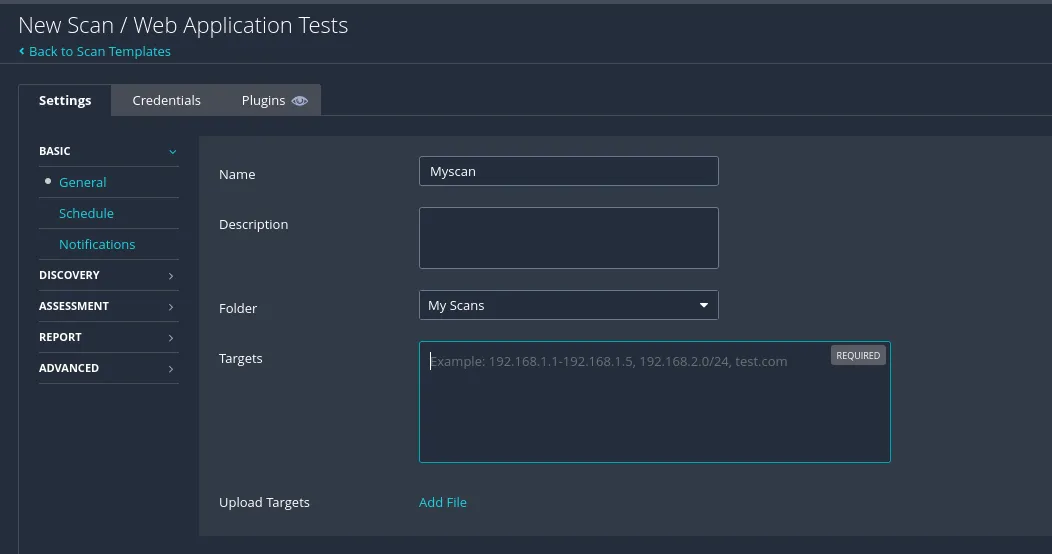
We can enter one target or multiple or even a file for targets. Since we only have one target we’ll be looking at that. We will leave the rest of the options on default but there’s quite some settings that we can look at.
We can schedule the scan or enter an email so that it can email us the scan results.
![image.png]@/assets/blog/2025/blog4/blog4(image%208.png)
We can change the scan type if needed but we’ll keep it at quick for the current scan. Once we’re done we will click on save. As soon as we do that we’ll see the following screen

To initiate the scan we will click on the play button.
Analyzing Scan Reports
We can click on the running scan to see what’s going on.
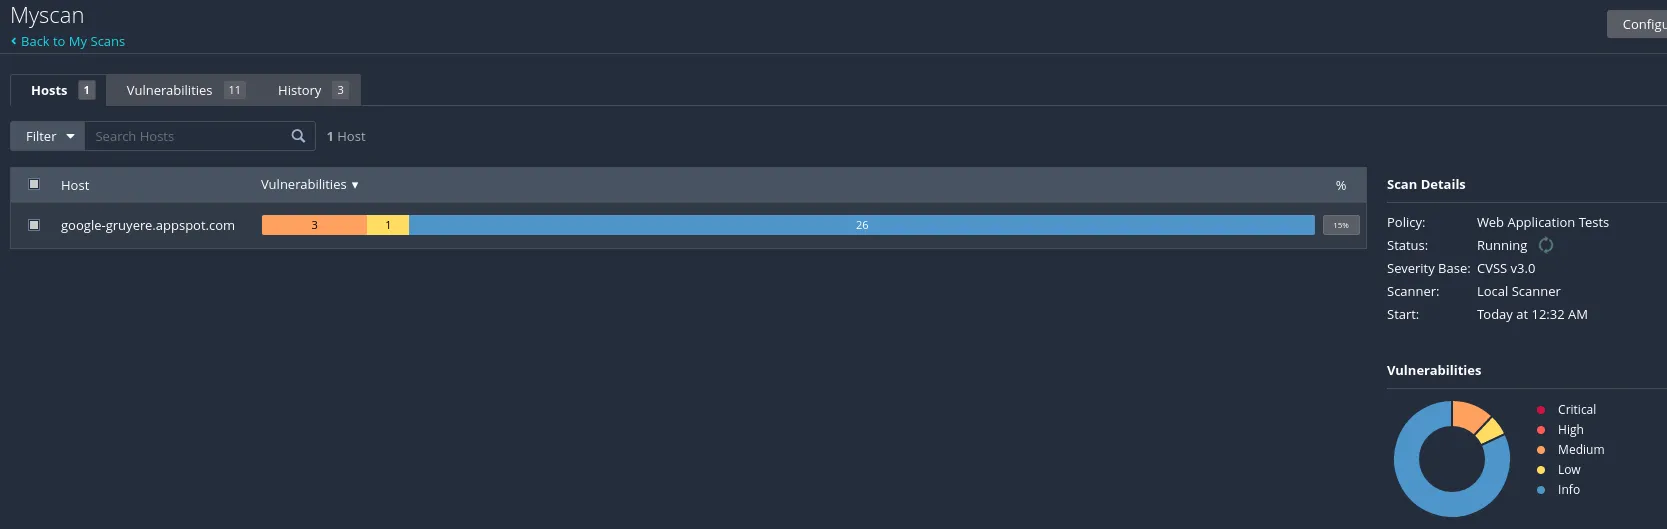
In the Hosts section we can see the hosts that were scanned, the number of vulnerabilities identified and their respective severity. Clicking on the Vulnerabilities section we can see the following:
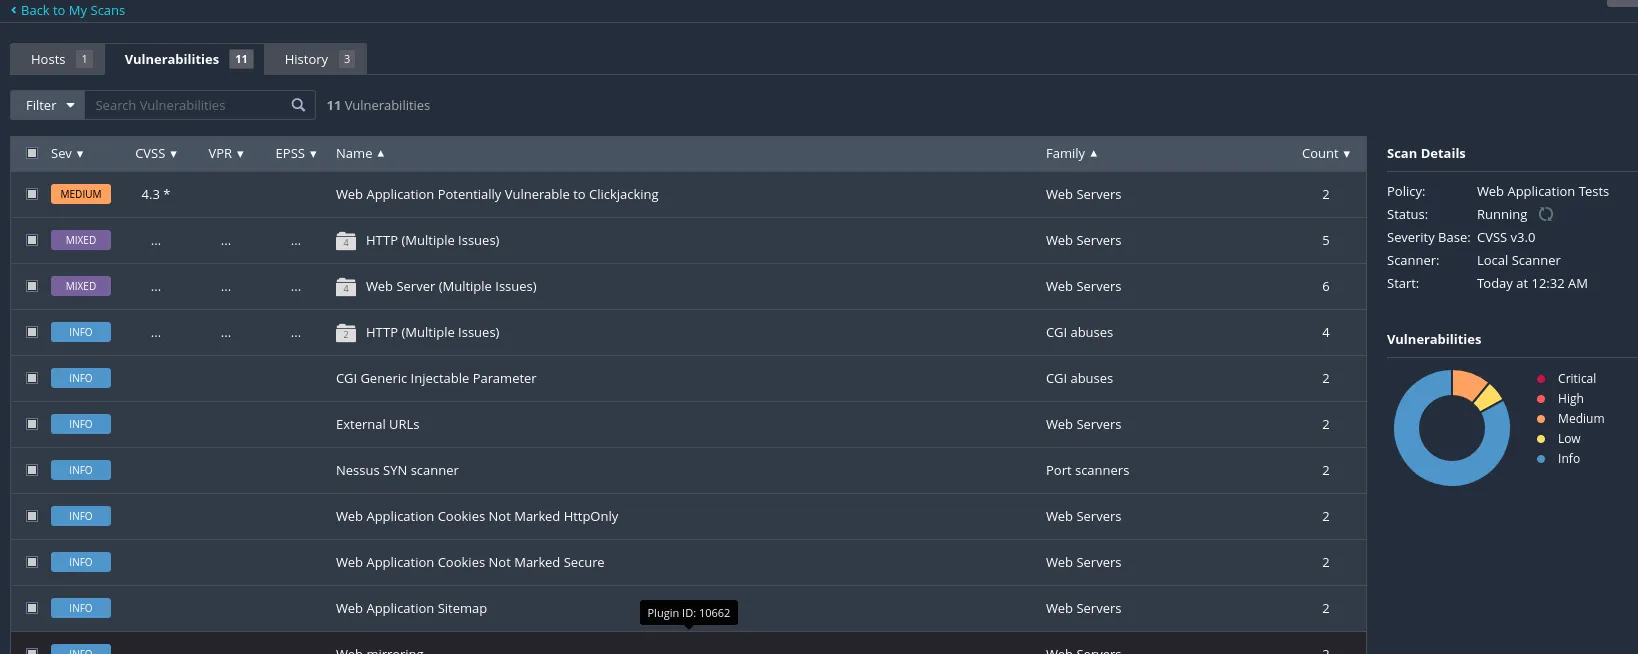
The Medium Vulnerability denotes the corresponding CVSS Rating. The Mixed section contains multiple different vulnerabilities. That and the other sections can be further clicked to see further information and detail on them.
Clicking on the first section yields the following result
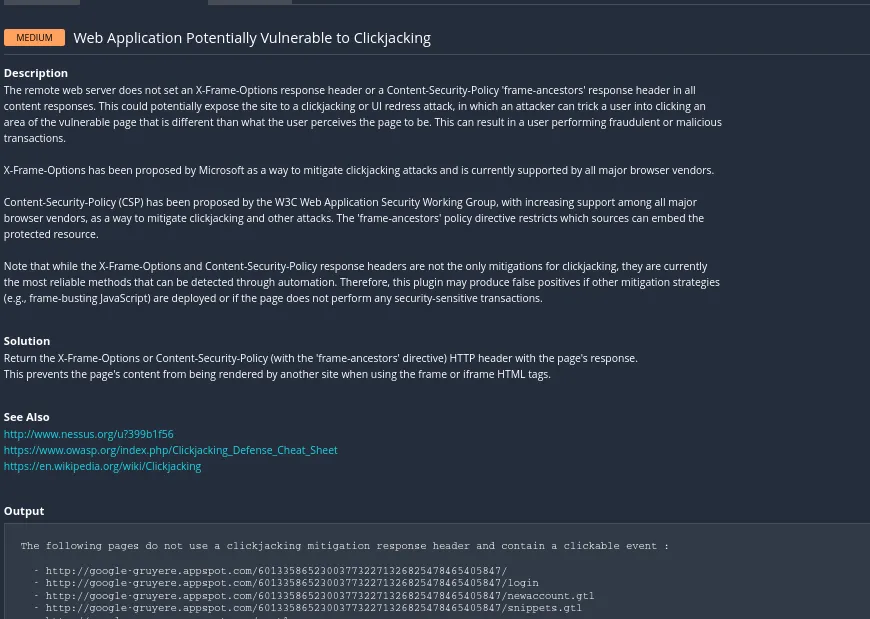
This shows us the the detail on the vulnerability, references and the pages effected by it.
Now to look at how to export a report. We need to make sure the scan has completed and then go to the scan options on the following page

We will click on the Report Option. That will open the following page:
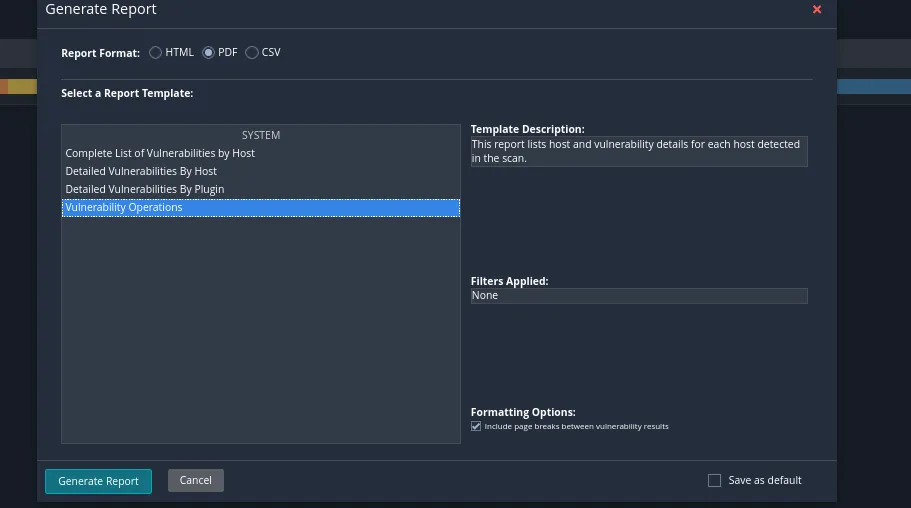
We will click on Generate Report to generate the report. I have selected the PDF option as it’s the easiest. We can then go through the report or use it in our vulnerability assessments.
OWASP ZAP
Automated Scanning with ZAP
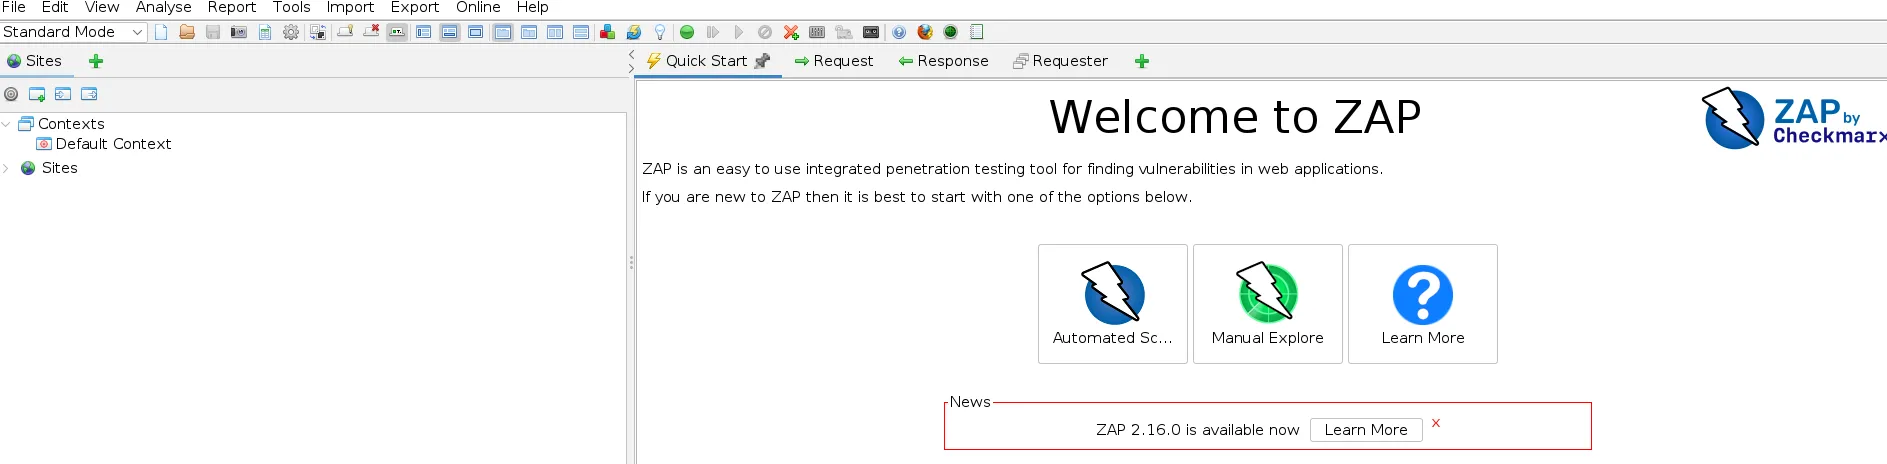
When we open ZAP we will be greeted by the following page:
We will select the Automated Scan Option and then on the following page
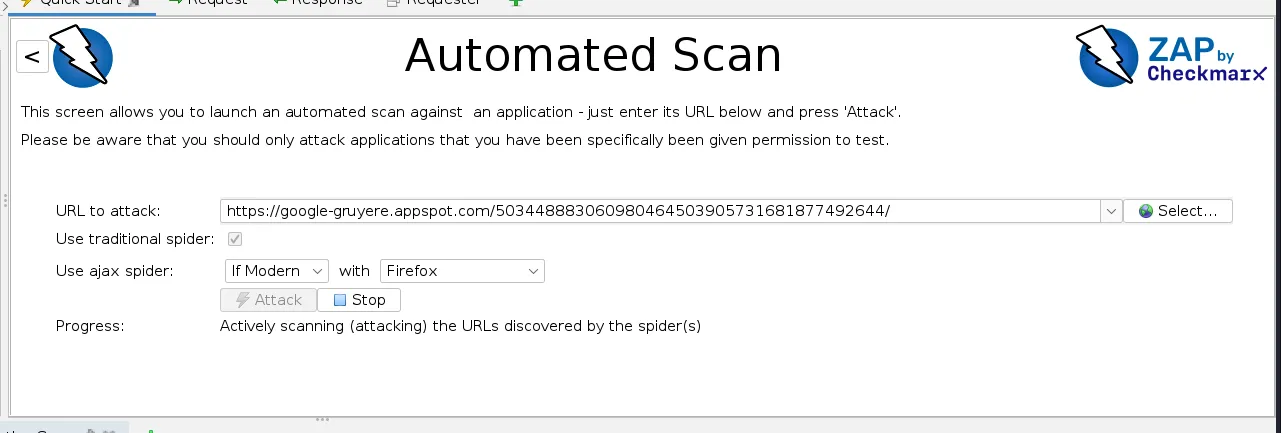
we will enter the URL and select the default options. Make sure the browser you have selected is installed and so on.
We will see the following menu options below which will populate with results once the scan is initiated:
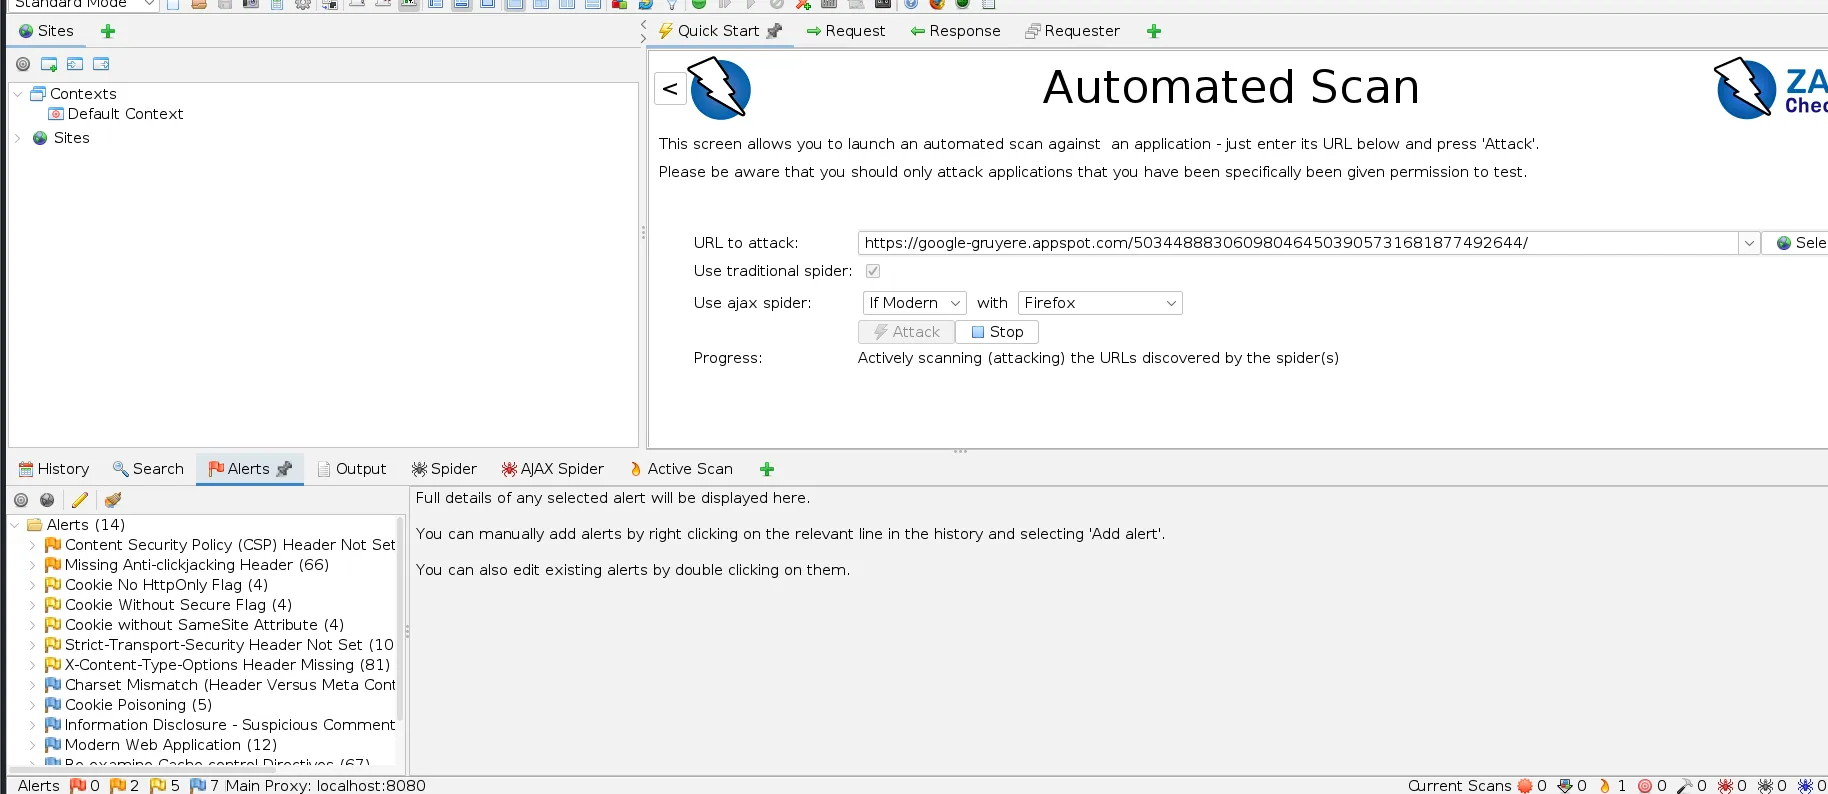
As we can see in the alerts section we can see the alerts and their corresponding details that can be seen by clicking on them.
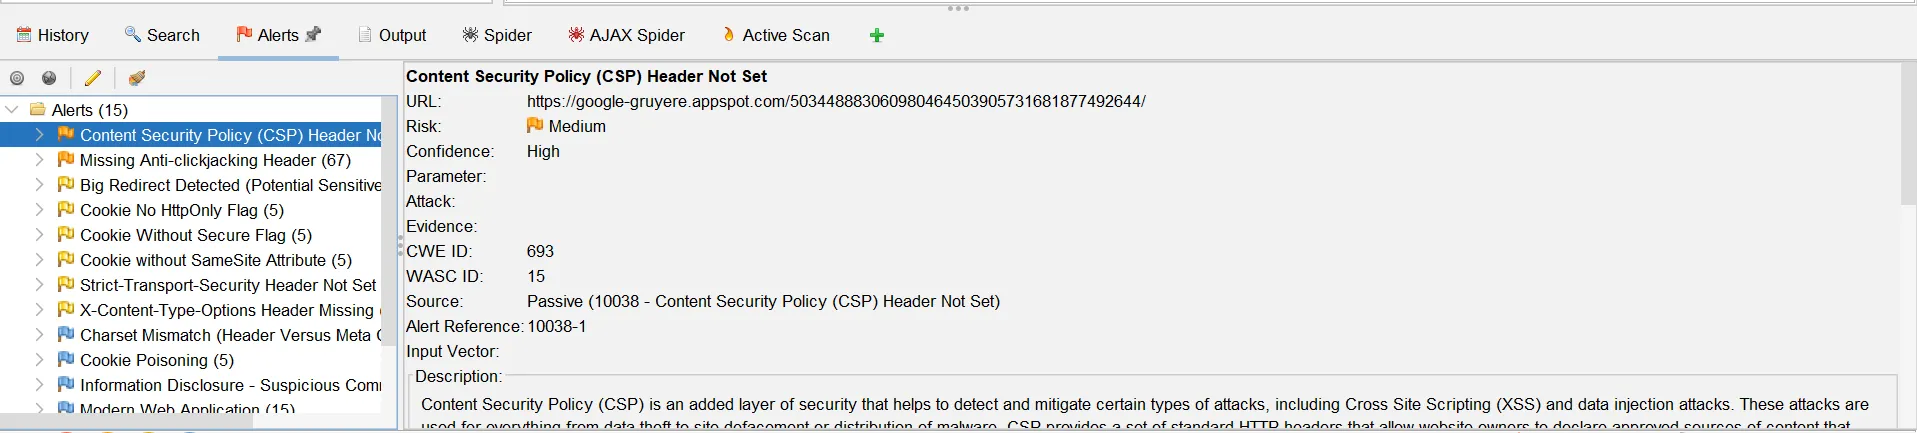
Hence here we can see the details on a vulnerability/alert.
This shows the AJAX Spider results and the URLs crawled. Out-of-Scope URLs will not be scanned and the scanned ones are denoted using a green icon.
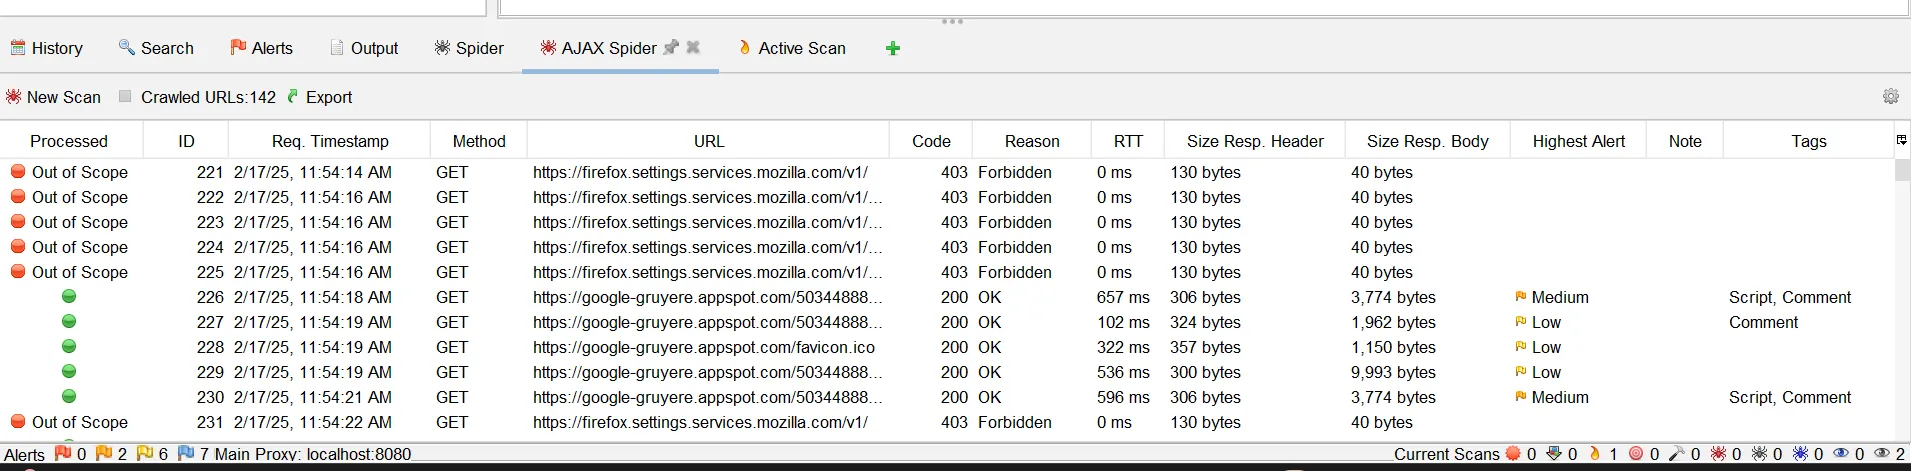
As you can see it shows a detail for each path.
We can now see the following Active Scan output:
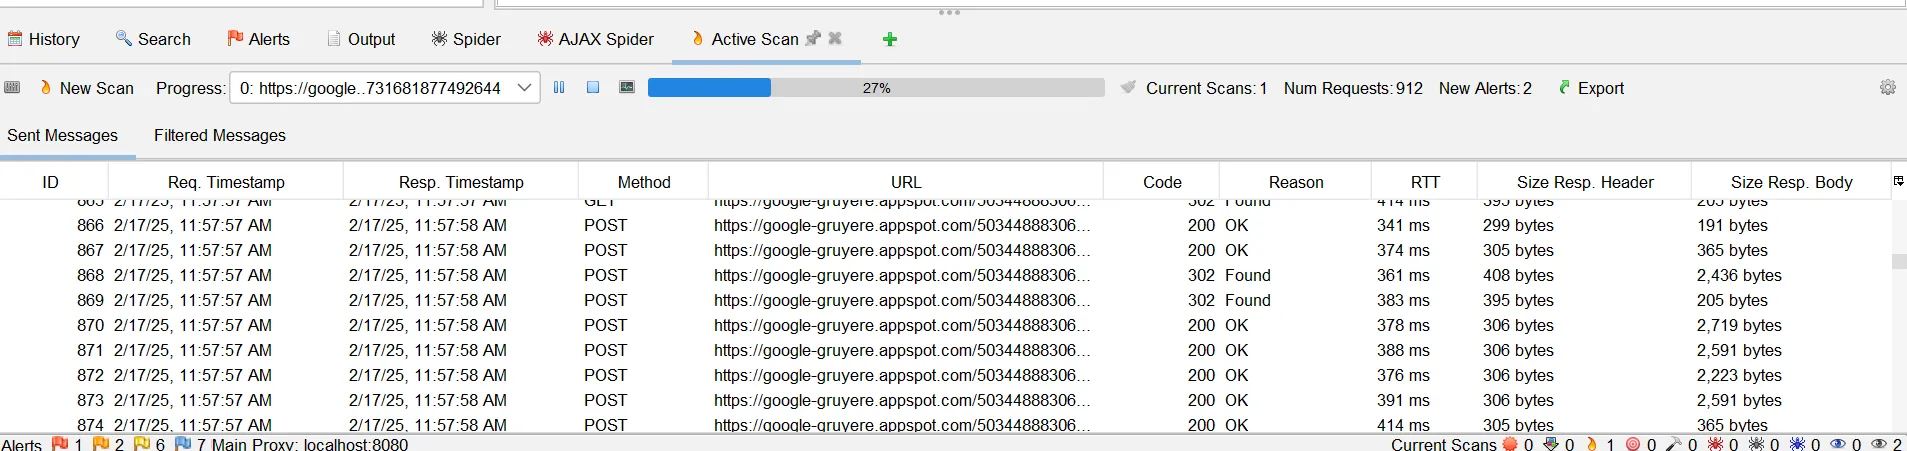
This shows the URLs crawled and the response code for them. This takes more time than the usual scan.
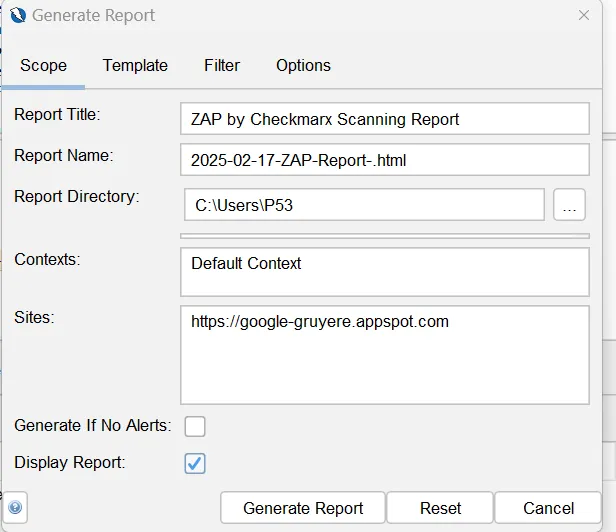
To generate a report for the above scan results we will select the Generate Report option
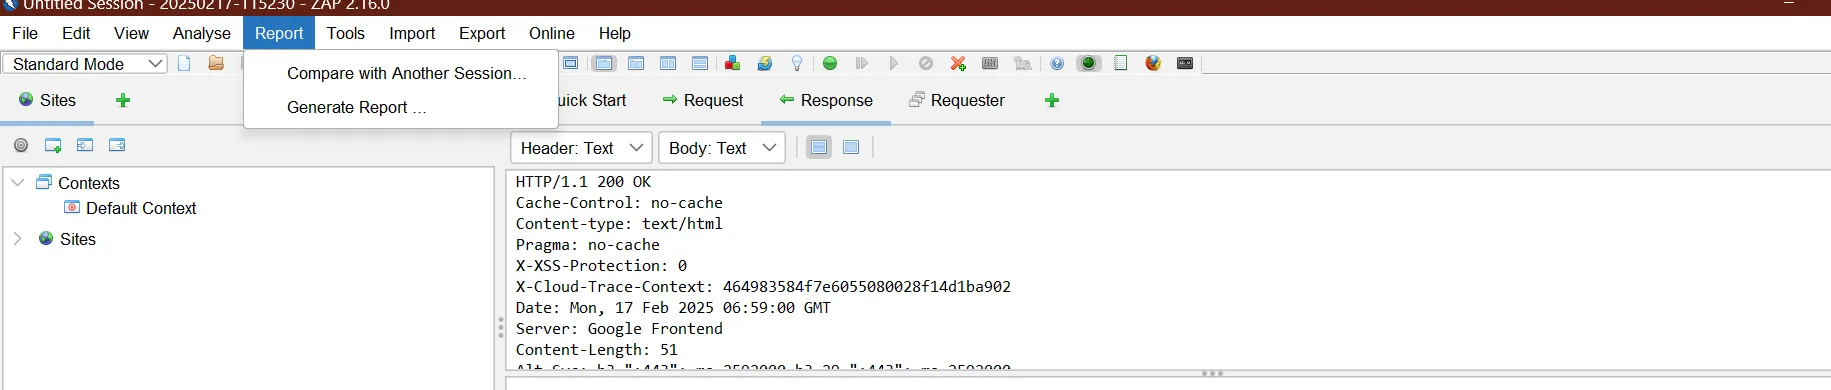
We can further modify the options we want to see in the report
Manual Testing with ZAP (Brief Overview)
We can also perform manual testing with ZAP in case we want more control over the scan and there are some login fields we want to fill manually. Select the Manual Testing option from the Quick-Start option
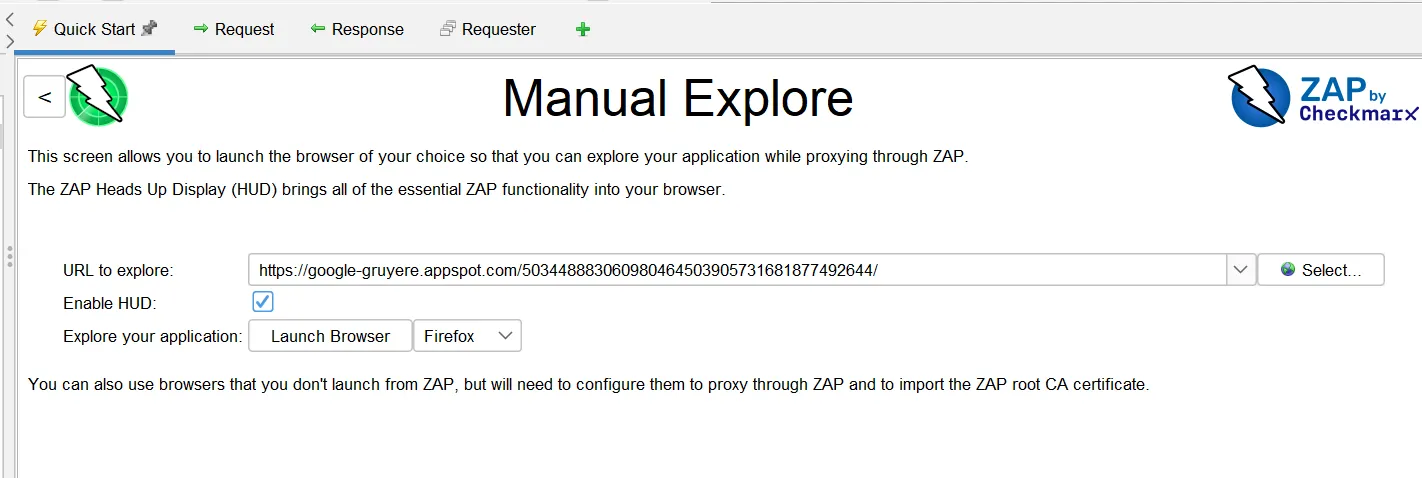
We need to make sure the Enable HUD option is selected.
After the browser is launched we are greeted by the following screen:
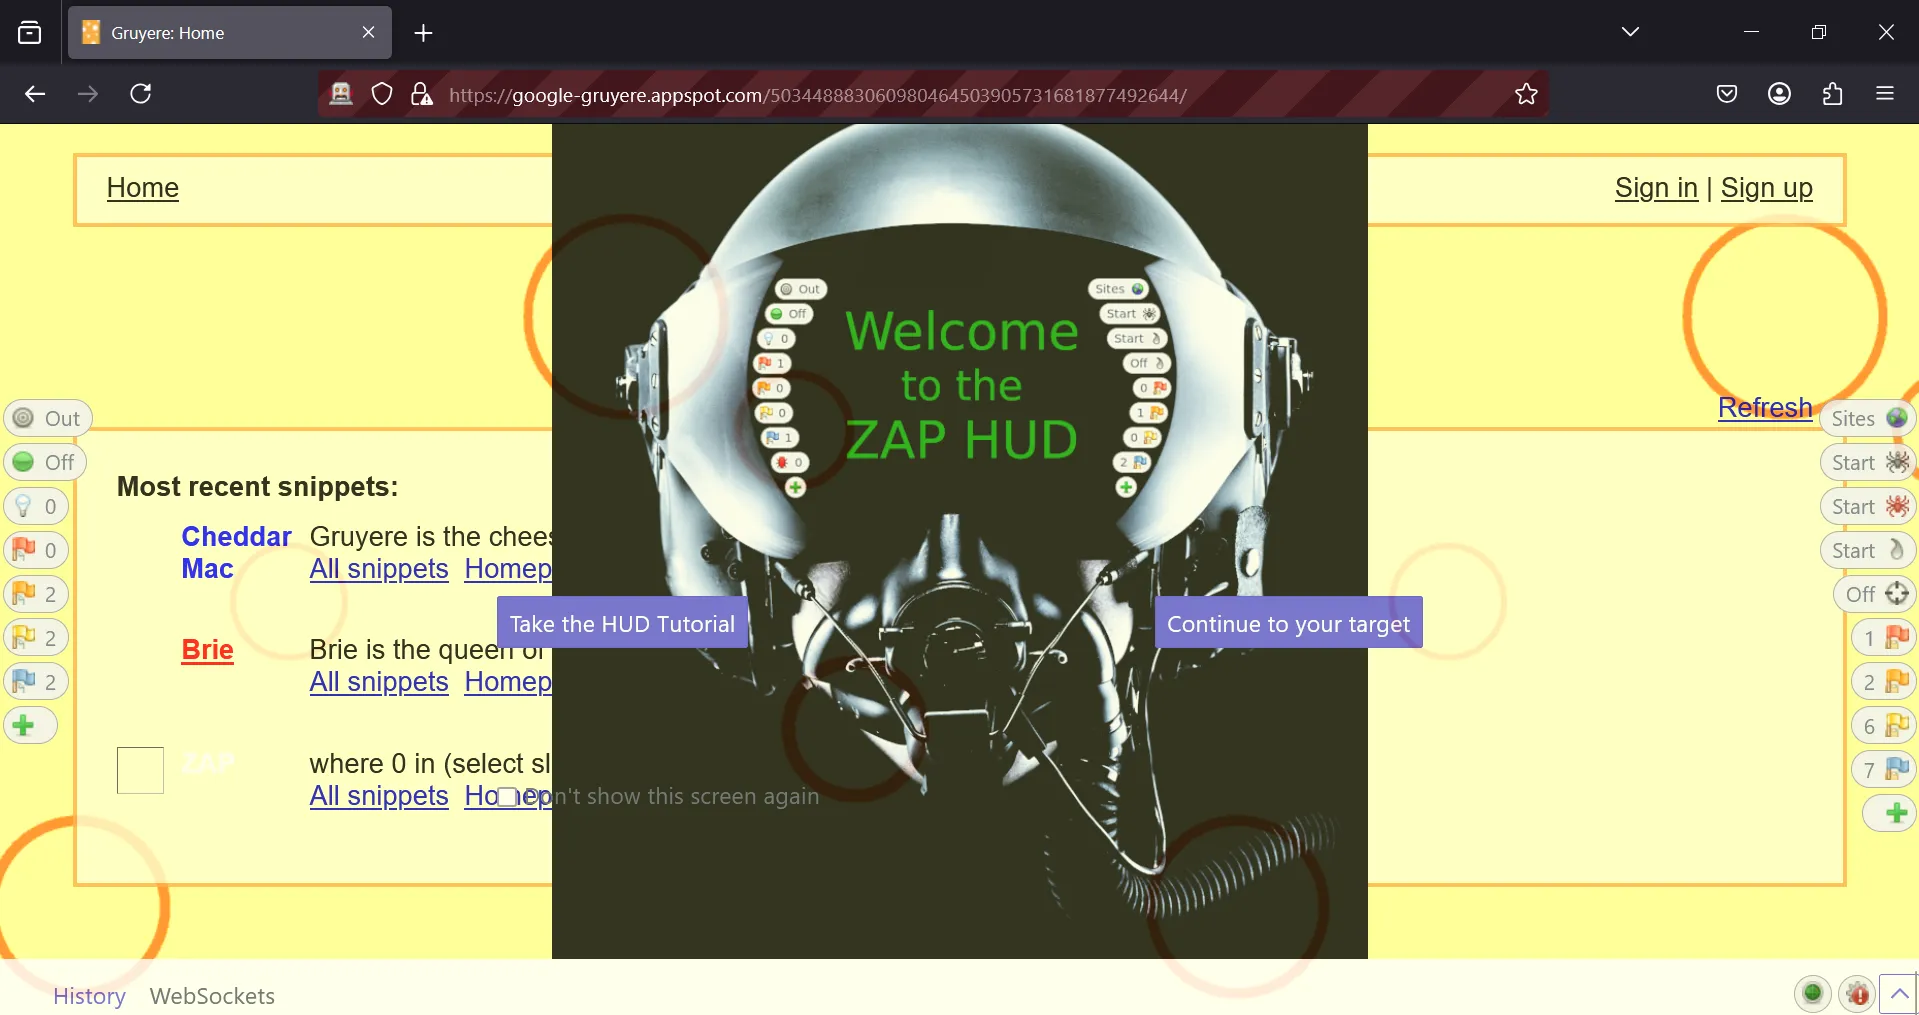
It’s recommended to take the HUD tutorial since it’ll give you overview on what the HUD is.
We will now select the top most option on the left i.e the one that says out. It will ask for confirmation Add current Domain to Scope? Select yes and proceed.
The second option named Break is used to capture requests. When it’s enabled each subsequent request will need to be manually approved to be sent to the web server. However, we will not test it out in this tutorial since it’s quite extensive.
The third option named Show/Enable is used to detect hidden parameters. When clicked it will show any hidden parameters that are not visible. Let’s look at the following example. We will go to the login field which by default shows this:

Now selecting the Show/Enable button we can see the hidden fields.
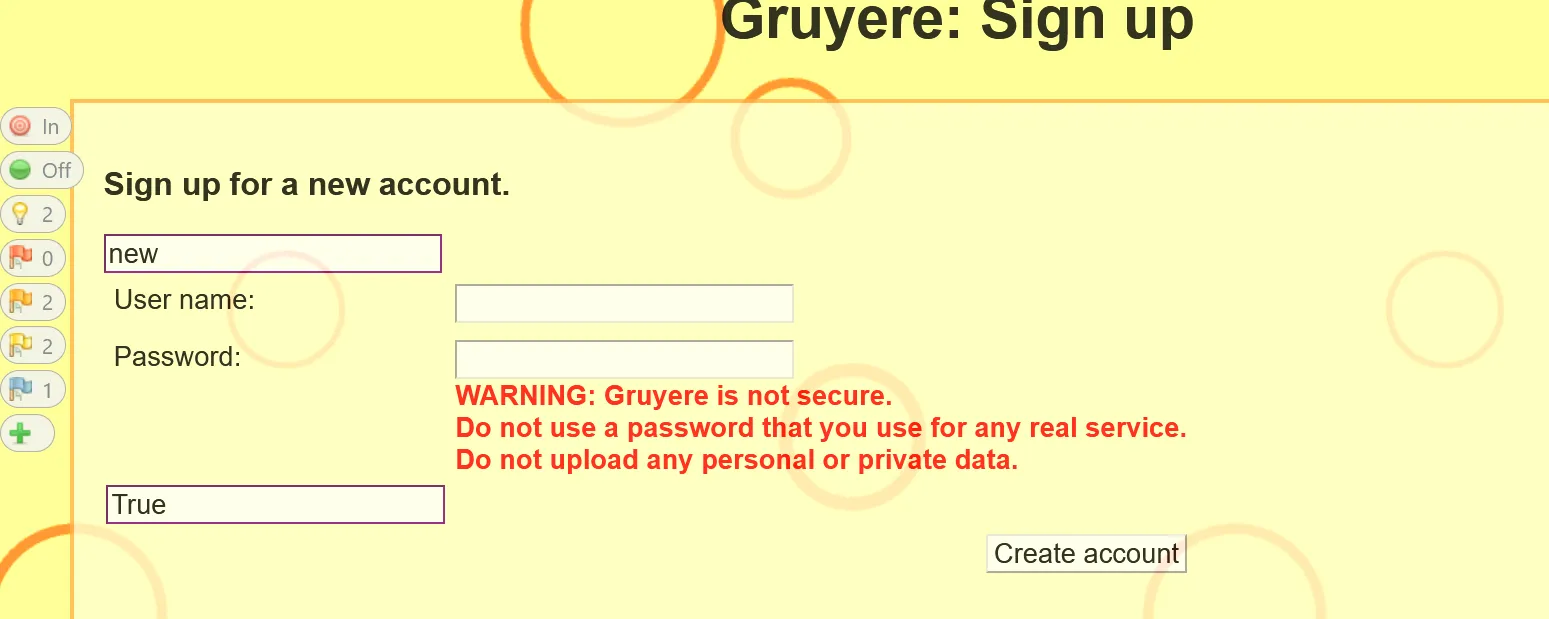
In the above image another things that need to be noted are the flags. The flags on the left side denote vulnerabilities on the current page and on the right side denote the total vulnerabilities. We can also start the Active Scan using the 4th button the right. The 5th option stands for Attack Mode. This will automatically test each page we open for vulnerabilities and can be opened.
Another option is the plus icon which can be used to add further plugins and such. This concludes the ZAP Section.
Nmap
Nmap Commands
Nmap is a versatile tool and as such has a lot of options. Here are the following options offered by Nmap:
┌──(kali㉿kali)-[~]
└─$ nmap -h
Nmap 7.94SVN ( https://nmap.org )
Usage: nmap [Scan Type(s)] [Options] {target specification}
TARGET SPECIFICATION:
  Can pass hostnames, IP addresses, networks, etc.
  Ex: scanme.nmap.org, microsoft.com/24, 192.168.0.1; 10.0.0-255.1-254
  -iL <inputfilename>: Input from list of hosts/networks
  -iR <num hosts>: Choose random targets
  --exclude <host1[,host2][,host3],...>: Exclude hosts/networks
  --excludefile <exclude_file>: Exclude list from file
HOST DISCOVERY:
  -sL: List Scan - simply list targets to scan
  -sn: Ping Scan - disable port scan
  -Pn: Treat all hosts as online -- skip host discovery
  -PS/PA/PU/PY[portlist]: TCP SYN/ACK, UDP or SCTP discovery to given ports
  -PE/PP/PM: ICMP echo, timestamp, and netmask request discovery probes
  -PO[protocol list]: IP Protocol Ping
  -n/-R: Never do DNS resolution/Always resolve [default: sometimes]
  --dns-servers <serv1[,serv2],...>: Specify custom DNS servers
  --system-dns: Use OS's DNS resolver
  --traceroute: Trace hop path to each host
SCAN TECHNIQUES:
  -sS/sT/sA/sW/sM: TCP SYN/Connect()/ACK/Window/Maimon scans
  -sU: UDP Scan
  -sN/sF/sX: TCP Null, FIN, and Xmas scans
  --scanflags <flags>: Customize TCP scan flags
  -sI <zombie host[:probeport]>: Idle scan
  -sY/sZ: SCTP INIT/COOKIE-ECHO scans
  -sO: IP protocol scan
  -b <FTP relay host>: FTP bounce scan
PORT SPECIFICATION AND SCAN ORDER:
  -p <port ranges>: Only scan specified ports
    Ex: -p22; -p1-65535; -p U:53,111,137,T:21-25,80,139,8080,S:9
  --exclude-ports <port ranges>: Exclude the specified ports from scanning
  -F: Fast mode - Scan fewer ports than the default scan
  -r: Scan ports sequentially - don't randomize
  --top-ports <number>: Scan <number> most common ports
  --port-ratio <ratio>: Scan ports more common than <ratio>
SERVICE/VERSION DETECTION:
  -sV: Probe open ports to determine service/version info
  --version-intensity <level>: Set from 0 (light) to 9 (try all probes)
  --version-light: Limit to most likely probes (intensity 2)
  --version-all: Try every single probe (intensity 9)
  --version-trace: Show detailed version scan activity (for debugging)
SCRIPT SCAN:
  -sC: equivalent to --script=default
  --script=<Lua scripts>: <Lua scripts> is a comma separated list of
           directories, script-files or script-categories
  --script-args=<n1=v1,[n2=v2,...]>: provide arguments to scripts
  --script-args-file=filename: provide NSE script args in a file
  --script-trace: Show all data sent and received
  --script-updatedb: Update the script database.
  --script-help=<Lua scripts>: Show help about scripts.
           <Lua scripts> is a comma-separated list of script-files or
           script-categories.
OS DETECTION:
  -O: Enable OS detection
  --osscan-limit: Limit OS detection to promising targets
  --osscan-guess: Guess OS more aggressively
TIMING AND PERFORMANCE:
  Options which take <time> are in seconds, or append 'ms' (milliseconds),
  's' (seconds), 'm' (minutes), or 'h' (hours) to the value (e.g. 30m).
  -T<0-5>: Set timing template (higher is faster)
  --min-hostgroup/max-hostgroup <size>: Parallel host scan group sizes
  --min-parallelism/max-parallelism <numprobes>: Probe parallelization
  --min-rtt-timeout/max-rtt-timeout/initial-rtt-timeout <time>: Specifies
      probe round trip time.
  --max-retries <tries>: Caps number of port scan probe retransmissions.
  --host-timeout <time>: Give up on target after this long
  --scan-delay/--max-scan-delay <time>: Adjust delay between probes
  --min-rate <number>: Send packets no slower than <number> per second
  --max-rate <number>: Send packets no faster than <number> per second
FIREWALL/IDS EVASION AND SPOOFING:
  -f; --mtu <val>: fragment packets (optionally w/given MTU)
  -D <decoy1,decoy2[,ME],...>: Cloak a scan with decoys
  -S <IP_Address>: Spoof source address
  -e <iface>: Use specified interface
  -g/--source-port <portnum>: Use given port number
  --proxies <url1,[url2],...>: Relay connections through HTTP/SOCKS4 proxies
  --data <hex string>: Append a custom payload to sent packets
  --data-string <string>: Append a custom ASCII string to sent packets
  --data-length <num>: Append random data to sent packets
  --ip-options <options>: Send packets with specified ip options
  --ttl <val>: Set IP time-to-live field
  --spoof-mac <mac address/prefix/vendor name>: Spoof your MAC address
  --badsum: Send packets with a bogus TCP/UDP/SCTP checksum
OUTPUT:
  -oN/-oX/-oS/-oG <file>: Output scan in normal, XML, s|<rIpt kIddi3,
     and Grepable format, respectively, to the given filename.
  -oA <basename>: Output in the three major formats at once
  -v: Increase verbosity level (use -vv or more for greater effect)
  -d: Increase debugging level (use -dd or more for greater effect)
  --reason: Display the reason a port is in a particular state
  --open: Only show open (or possibly open) ports
  --packet-trace: Show all packets sent and received
  --iflist: Print host interfaces and routes (for debugging)
  --append-output: Append to rather than clobber specified output files
  --resume <filename>: Resume an aborted scan
  --noninteractive: Disable runtime interactions via keyboard
  --stylesheet <path/URL>: XSL stylesheet to transform XML output to HTML
  --webxml: Reference stylesheet from Nmap.Org for more portable XML
  --no-stylesheet: Prevent associating of XSL stylesheet w/XML output
MISC:
  -6: Enable IPv6 scanning
  -A: Enable OS detection, version detection, script scanning, and traceroute
  --datadir <dirname>: Specify custom Nmap data file location
  --send-eth/--send-ip: Send using raw ethernet frames or IP packets
  --privileged: Assume that the user is fully privileged
  --unprivileged: Assume the user lacks raw socket privileges
  -V: Print version number
  -h: Print this help summary page.
EXAMPLES:
  nmap -v -A scanme.nmap.org
  nmap -v -sn 192.168.0.0/16 10.0.0.0/8
  nmap -v -iR 10000 -Pn -p 80
SEE THE MAN PAGE (https://nmap.org/book/man.html) FOR MORE OPTIONS AND EXAMPLE
We will only look at a few optionssince going through all of them would take too much time. We will look at the following scan parameters:
- Default Scan: The default Nmap scan (
nmap <target>) performs a TCP SYN scan (if run as root) or a TCP connect scan (if run as a regular user) on the 1,000 most common ports. It checks if the target host is up using ICMP ping, identifies open ports, and attempts to detect the service and version running on those ports. The results are displayed in a concise format, showing open ports, their state, and associated services. This scan is quick and efficient for basic reconnaissance. -v:This shows the verbose output for the scan as the scan is progressing. Without this enabled the scan results are shown after it’s completion.-O:This performs OS detection on the scanned hosts/IPs.-p:This scans particular ports.-p22will scan port 22 only.-p5-4000will scan ports 4 to 4000.-sVPerforms version detection on open ports.
Interpreting Nmap Output
We will now look at different scan outputs to see the difference in them:
┌──(kali㉿kali)-[~]
└─$ nmap google-gruyere.appspot.com
Starting Nmap 7.94SVN ( https://nmap.org ) at 2025-02-17 03:05 EST
Nmap scan report for google-gruyere.appspot.com (192.178.24.180)
Host is up (0.079s latency).
Other addresses for google-gruyere.appspot.com (not scanned): 2a00:1450:4018:803::2014
rDNS record for 192.178.24.180: mct04s02-in-f20.1e100.net
Not shown: 995 filtered tcp ports (no-response), 3 filtered tcp ports (host-unreach)
PORT    STATE SERVICE
80/tcp  open  http
443/tcp open  https

Nmap done: 1 IP address (1 host up) scanned in 58.21 seconds
This was the default nmap scan and it shows the following output. It shows that the host is up and the corresponding latency for that. Also shows the addresses for it and the DNS record. Also shows the ports that are open and number of filtered ports. Now we will try with OS Detection.
──(kali㉿kali)-[~]
└─$ sudo nmap google-gruyere.appspot.com -O
[sudo] password for kali:
Starting Nmap 7.94SVN ( https://nmap.org ) at 2025-02-17 03:09 EST
Nmap scan report for google-gruyere.appspot.com (192.178.24.180)
Host is up (0.034s latency).
Other addresses for google-gruyere.appspot.com (not scanned): 2a00:1450:4018:802::2014
rDNS record for 192.178.24.180: mct04s02-in-f20.1e100.net
Not shown: 998 filtered tcp ports (no-response)
PORT    STATE SERVICE
80/tcp  open  http
443/tcp open  https
Warning: OSScan results may be unreliable because we could not find at least 1 open and 1 closed port
Aggressive OS guesses: DD-WRT v24-sp2 (Linux 2.4.37) (96%), Microsoft Windows XP SP3 or Windows 7 or Windows Server 2012 (96%), VMware Player virtual NAT device (96%), Actiontec MI424WR-GEN3I WAP (95%), Linux 4.4 (93%), Microsoft Windows XP SP3 (93%), Linux 3.2 (92%), BlueArc Titan 2100 NAS device (90%), DVTel DVT-9540DW network camera (86%)
No exact OS matches for host (test conditions non-ideal).

OS detection performed. Please report any incorrect results at https://nmap.org/submit/ .
Nmap done: 1 IP address (1 host up) scanned in 67.11 seconds
It shows the following output. We can see the additional OS Lines corresponding to the Operating Systems that may be running on the server. Now we will add -sV and -v and see the results:
──(kali㉿kali)-[~]
└─$ sudo nmap google-gruyere.appspot.com -sV -v
Starting Nmap 7.94SVN ( https://nmap.org ) at 2025-02-17 03:11 EST
NSE: Loaded 46 scripts for scanning.
Initiating Ping Scan at 03:11
Scanning google-gruyere.appspot.com (192.178.24.180) [4 ports]
Completed Ping Scan at 03:11, 0.04s elapsed (1 total hosts)
Initiating Parallel DNS resolution of 1 host. at 03:11
Completed Parallel DNS resolution of 1 host. at 03:11, 0.02s elapsed
Initiating SYN Stealth Scan at 03:11
Scanning google-gruyere.appspot.com (192.178.24.180) [1000 ports]
Discovered open port 80/tcp on 192.178.24.180
Discovered open port 443/tcp on 192.178.24.180
Increasing send delay for 192.178.24.180 from 0 to 5 due to 11 out of 14 dropped probes since last increase.
Increasing send delay for 192.178.24.180 from 5 to 10 due to 11 out of 11 dropped probes since last increase.
SYN Stealth Scan Timing: About 55.10% done; ETC: 03:12 (0:00:30 remaining)
Completed SYN Stealth Scan at 03:12, 54.43s elapsed (1000 total ports)
Initiating Service scan at 03:12
Scanning 2 services on google-gruyere.appspot.com (192.178.24.180)
Completed Service scan at 03:12, 0.72s elapsed (2 services on 1 host)
NSE: Script scanning 192.178.24.180.
Initiating NSE at 03:12
Completed NSE at 03:12, 4.20s elapsed
Initiating NSE at 03:12
Completed NSE at 03:12, 2.02s elapsed
Nmap scan report for google-gruyere.appspot.com (192.178.24.180)
Host is up (0.0055s latency).
Other addresses for google-gruyere.appspot.com (not scanned): 2a00:1450:4018:802::2014
rDNS record for 192.178.24.180: mct04s02-in-f20.1e100.net
Not shown: 998 filtered tcp ports (no-response)
PORT    STATE SERVICE    VERSION
80/tcp  open  tcpwrapped
443/tcp open  tcpwrapped

Read data files from: /usr/bin/../share/nmap
Service detection performed. Please report any incorrect results at https://nmap.org/submit/ .
Nmap done: 1 IP address (1 host up) scanned in 62.14 seconds
           Raw packets sent: 2043 (89.704KB) | Rcvd: 555 (22.208KB)
As we can see in the above output we saw verbose output which shows details of the scan. We might not see the service versions since there’s not any other ports option and hence no services but this is the general idea.
Comparing the Tools
Strengths and Weaknesses of Each Tool
Automated vulnerability assessment tools are essential for identifying security gaps, but not all tools are created equal. Let’s break down the strengths and weaknesses of RapidScan, Nikto, Nessus, OWASP ZAP, and Nmap to help you decide which fits your needs.
1. RapidScan
Strengths:
- All-in-One Tool: Combines multiple scanners (like Nikto, Nmap, and others) into a single workflow, saving time.
- Beginner-Friendly: Simple commands generate detailed reports, ideal for quick assessments.
- Open-Source: Free to use and customizable for those familiar with scripting.
Weaknesses:
- Surface-Level Scans: Relies on underlying tools, so depth depends on their capabilities.
- False Positives: Aggregating results can lead to noise, requiring manual verification.
- Community-Driven Updates: May lag behind in detecting the latest vulnerabilities.
2. Nikto
Strengths:
- Web Server Focus: Excellent for spotting misconfigurations, outdated software, and common web vulnerabilities.
- Lightweight: Runs quickly and integrates easily into scripts or pipelines.
- Mature Project: Trusted for over a decade, with a reliable database of known issues.
Weaknesses:
- Noisy Scans: Lacks stealth, often triggering intrusion detection systems (IDS).
- Limited Scope: Struggles with modern web apps (SPAs, APIs) and authenticated scans.
- Basic Reporting: Outputs require significant manual analysis.
3. Nessus
Strengths:
- Comprehensive Coverage: Massive vulnerability database with daily updates for zero-days and emerging threats.
- Granular Customization: Tailor scans by asset type, compliance standards (e.g., PCI DSS), or risk level.
- User-Friendly Interface: Ideal for enterprises with dedicated security teams.
Weaknesses:
- Costly: Licensing fees for additional features make it prohibitive for small teams or personal use.
- Resource-Intensive: Requires robust infrastructure for large-scale scans.
- Complexity: Overwhelming for beginners without training.
4. OWASP ZAP (Zed Attack Proxy)
Strengths:
- Web App Specialization: Perfect for DAST (Dynamic Application Security Testing), including AJAX and APIs.
- Active Community: Regularly updated with OWASP’s guidance on critical risks.
- Flexibility: Supports automated scans and manual penetration testing in one tool.
Weaknesses:
- Steep Learning Curve: Advanced features (like scripting) demand technical expertise.
- Performance Issues: Large-scale scans can slow down systems.
- False Positives: Requires manual triage to filter results.
5. Nmap
Strengths:
- Network Recon King: Unmatched for discovering live hosts, open ports, and services.
- Scripting Engine: Extend functionality with NSE (Nmap Scripting Engine) for vulnerability detection.
- Cross-Platform: Works seamlessly on Linux, Windows, and macOS.
Weaknesses:
- Not a Dedicated Vuln Scanner: Primarily a recon tool; needs add-ons for deep vulnerability analysis.
- Limited Reporting: Outputs are technical and require interpretation.
- Ethical Concerns: Aggressive scans can disrupt services if misconfigured.
Quick Comparison Table
| Tool | Best For | Pros | Cons |
|---|---|---|---|
| RapidScan | Quick, consolidated scans | Free, multi-tool integration | Shallow results, noisy output |
| Nikto | Web server checks | Lightweight, reliable for basics | No stealth, limited depth |
| Nessus | Enterprise-grade assessments | Comprehensive, compliance-ready | Expensive, resource-heavy |
| OWASP ZAP | Web app testing | DAST + manual testing, OWASP-aligned | Complex setup, slow on big apps |
| Nmap | Network mapping | Unbeatable recon, scripting flexibility | Not a dedicated vuln scanner |
When to Use Which Tool
Each of these vulnerability assessment tools has its strengths and is suited for different aspects of security testing. Here’s a breakdown of when to use each:
-
Nmap – Reconnaissance & Port Scanning
Nmap is best for mapping out a target’s attack surface. It helps identify open ports, services, and potential vulnerabilities before diving into deeper scans. Use it in the early phases of an assessment to gather intelligence on the target system.
-
RapidScan – Quick, Multi-Tool Scanning
If you’re short on time and need a broad scan without running multiple tools separately, RapidScan is a good choice. It combines results from several security scanners, giving a quick overview of vulnerabilities without deep analysis.
-
Nikto – Web Server & Application Scanning
Nikto is useful when assessing web servers for outdated software, misconfigurations, and known vulnerabilities. It’s not stealthy but is great for quickly checking for low-hanging security issues on web applications.
-
OWASP ZAP – Web Application Security Testing
ZAP shines when performing deeper web application assessments. It can automatically detect security flaws like SQL injection, XSS, and authentication issues. Use it when you need both active and passive scanning of web applications.
-
Nessus – Comprehensive Vulnerability Assessment
Nessus is the go-to tool for a detailed vulnerability assessment across networks, servers, and applications. It provides vulnerability details, CVE references, and risk ratings. Use it when you need a full security audit with compliance checks.
Choosing the Right Tool
- For quick recon: Nmap
- For an all-in-one fast scan: RapidScan
- For web server misconfigurations: Nikto
- For in-depth web app testing: OWASP ZAP
- For full-scale vulnerability assessment: Nessus
Best Practices
Handling False Positives
When conducting automated vulnerability assessments, following best practices ensures accurate results and reduces unnecessary noise. One of the key challenges in this process is handling false positives.
False positives occur when a tool flags a vulnerability that doesn’t actually exist or isn’t exploitable. Here’s how to manage them effectively:
- Verify Findings Manually – Automated tools can sometimes misinterpret responses. Always validate critical findings by manually testing them using different methods or tools.
- Cross-Check with Multiple Tools – No single tool is perfect. If a vulnerability is flagged, check if other scanners report the same issue. For example, if Nessus reports a web vulnerability, validate it with OWASP ZAP or Nikto.
- Understand the Tool’s Limitations – Some tools rely on banner grabbing or outdated vulnerability databases, leading to inaccurate results. Familiarize yourself with how each tool detects vulnerabilities.
- Use Context Awareness – A flagged issue might be a vulnerability in one environment but not in another. Assess the actual risk based on system configurations, network exposure, and the presence of security controls.
- Regularly Update Tools and Databases – Many false positives stem from outdated vulnerability signatures. Keeping your scanners updated ensures more accurate results.
- Leverage Manual Testing and Exploitation Frameworks – If a high-risk vulnerability is detected, try verifying it with penetration testing tools like Metasploit to confirm exploitability.
Frequency of Scans
Determining the optimal frequency of vulnerability scans is essential for maintaining robust security. The appropriate schedule depends on your organization’s risk tolerance, compliance requirements, and IT infrastructure. Here are key guidelines for scheduling scans:
- Regularly Scheduled Scans – Run automated vulnerability scans at least monthly to catch new security risks and misconfigurations early.
- After System or Application Updates – Scan after any system, web application, or network configuration changes to verify that updates haven’t introduced vulnerabilities.
- Following a Security Incident – Conduct a comprehensive vulnerability scan after any breach or security incident to identify weaknesses that may have enabled the attack.
- Compliance-Driven Scans – Finance, healthcare, and other regulated industries must perform vulnerability assessments at specific intervals (e.g., quarterly or annually) to meet standards like PCI-DSS, HIPAA, or ISO 27001.
- Continuous Scanning for Critical Assets – Monitor high-value targets like internet-facing systems and production servers weekly or even daily with automated tools to catch emerging threats immediately.
Conclusion
Key-Points
Why Vulnerability Assessments Matter
- They help identify security weaknesses before attackers can exploit them.
- Provide critical insights into potential threats, making it easier to prioritize and fix vulnerabilities.
Steps in a Vulnerability Assessment
- Discovering Vulnerabilities – Scanning and mapping out security weaknesses across systems.
- Analyzing Risks – Understanding the cause, impact, and scope of each vulnerability.
- Prioritizing Threats – Categorizing vulnerabilities based on their severity and risk level.
- Fixing Security Gaps – Implementing patches, configuration changes, or mitigation strategies.
- Documenting & Reporting – Keeping records of vulnerabilities and remediation actions for future security improvements.
Why Automate Vulnerability Scanning?
- Saves Time & Effort – Quickly scans multiple systems, reducing manual work.
- Enables Regular Monitoring – Can be scheduled to run at set intervals for continuous security.
- Covers a Wide Attack Surface – Detects various types of vulnerabilities efficiently.
- Helps Prioritize Risks – Automatically ranks vulnerabilities by severity for better decision-making.
Comparison of Tools Used
- RapidScan – Combines multiple scanning tools for a quick, broad analysis.
- Nikto – Best for detecting outdated software and misconfigurations in web servers.
- Nessus – Offers a deep, compliance-focused scan across different platforms.
- OWASP ZAP – Specializes in web application security testing.
- Nmap – A powerful tool for network discovery and security auditing.
Final Thoughts
- Regular vulnerability assessments are essential for strong cybersecurity.
- Choose the right tools based on your security needs and environment.
- Keep track of findings, remediation efforts, and trends to continuously improve security.
Additional Resources
Explore these official guides and community resources to deepen your understanding of the tools discussed:
-
Nmap Documentation
Delve into comprehensive guides and the reference manual for Nmap to master network exploration and security auditing.
-
Nikto Wiki
Access detailed usage instructions, configuration tips, and community insights for Nikto via its official GitHub Wiki.
-
Nessus Getting Started Guide
Get up and running with Nessus through this official guide, which covers scan setup, configuration, and best practices.
-
OWASP ZAP Documentation
Find in-depth tutorials, user manuals, and developer guides to maximize your use of OWASP ZAP for web application security testing.
-
RapidScan GitHub Repository
Explore the source code, installation instructions, and updates for RapidScan—your multi-tool for web vulnerability assessments.
-
OWASP Web Security Testing Guide
Complement your automated scans with a thorough understanding of manual testing techniques and best practices.
These resources provide valuable insights and practical guidance to enhance your vulnerability assessment strategies.